Fuzzing with AFL workshop

henry Lv4

环境搭建

1
2
3
4
5
6
7
8
# 拉镜像
docker pull aflplusplus/aflplusplus:latest
# 监听2222端口通过ssh连
sudo docker run -it --privileged -e PASSMETHOD=env -e PASS=123123 -p 2222:2222 ghcr.io/mykter/fuzz-training
# 直接进入shell
sudo docker run -v -it --privileged -e PASSMETHOD=env -e PASS=123123 -p 2222:2222 ghcr.io/mykter/fuzz-training:latest /bin/bash
# 另外启一个terminal输入下面的指令,密码是上面PASS的值
ssh fuzzer@127.0.0.1 -p 2222

Reference

https://github.com/mykter/afl-training

常见错误
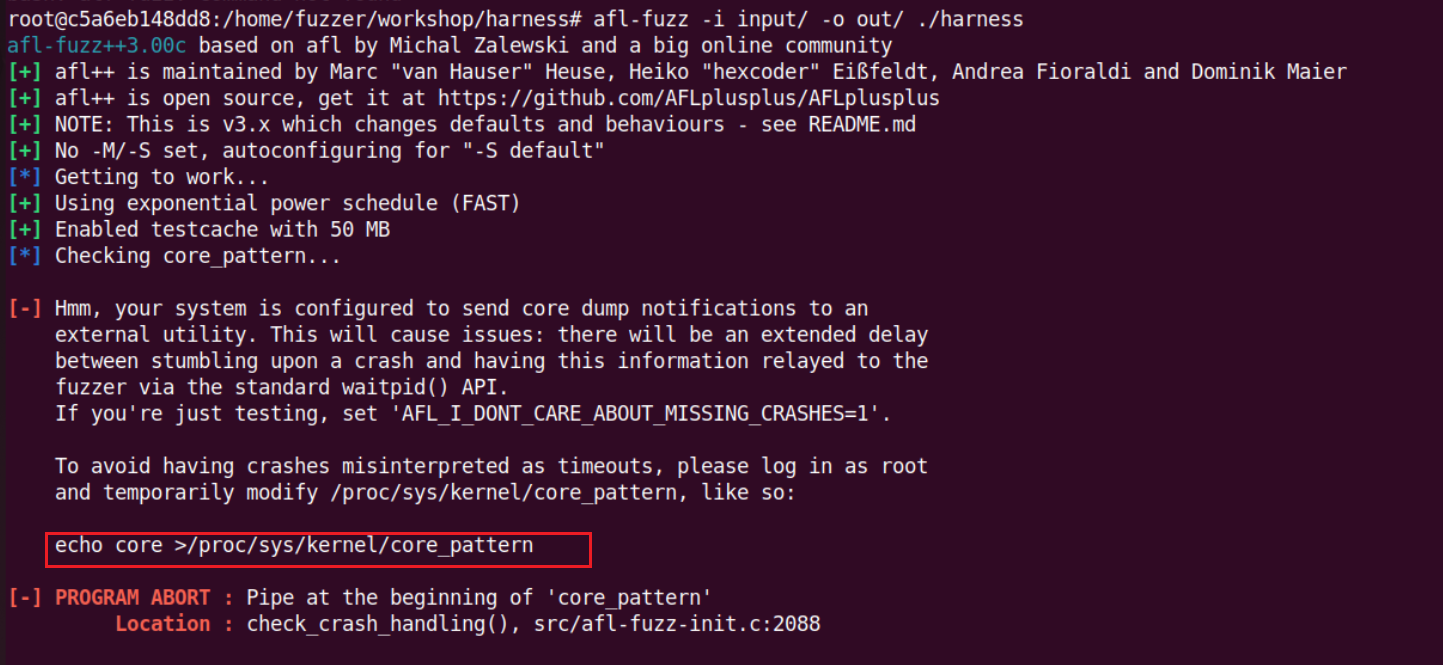
nipaste_2024-07-02_17-31-4

docker 起的时候加个 –privileged 参数就可以了

1
sudo docker run -v -it --privileged -e PASSMETHOD=env -e PASS=mhl123 -p 2222:2222 ghcr.io/mykter/fuzz-training:latest /bin/bash

AFL++基本架构

Fuzzding theory 中的基本理论:越多的状态被发现,漏洞被发现的可能性越高,为了衡量这一指标使用代码覆盖率作为表示状态数量的指标。现在的绝大多数主流 fuzzer 都以获得更高的代码覆盖率作为目标,称为覆盖率指引(coverage-guided)。

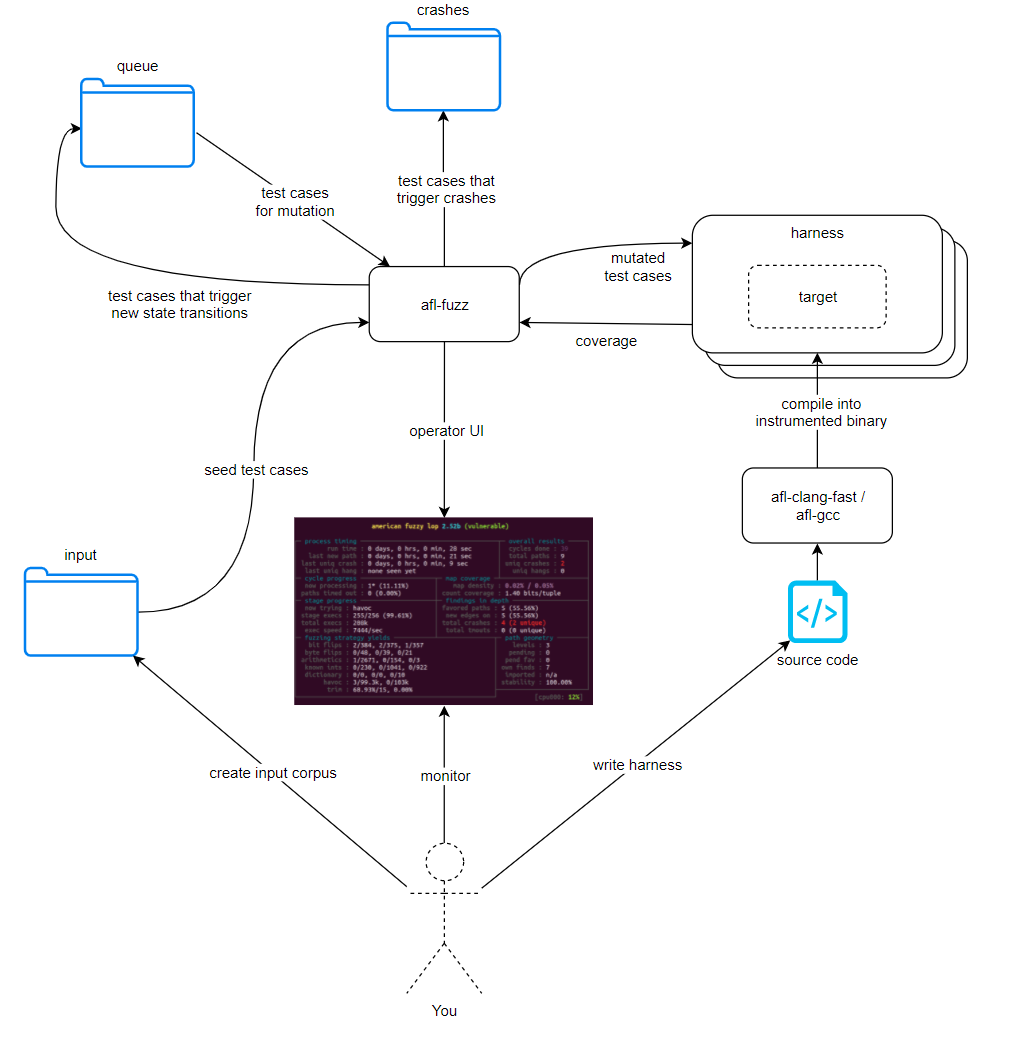
AFL++ 同样是一个覆盖率引导的 Fuzzer,其通常以(edge,定义为控制流图中由一个基本块到另一基本块的控制流转移)作为代码覆盖率测试粒度,并使用位图(bitmap)存储代码覆盖率,其基本结构如下图所示:

  • afl-fuzz :AFL++ 本体,负责管控一切
  • input 文件夹原始输入语料库,AFL++ 将其中的文件作为初始输入喂给待测目标程序
  • harness待测目标,afl 执行待测目标获得覆盖率信息,再通过覆盖率信息对输入进行编译喂给待测目标,并持续循环该过程;harness 可以是待测目标本体,也可以是自行编写的 wrapper
  • queue :输入队列,在获取到覆盖率信息后,afl 会将触发了新的状态的输入放到 queue 中,在下次执行时从 queue 中取出新的测试用例并进行变异
  • crashes:存放崩溃信息的文件夹

nipaste_2024-06-19_20-23-5

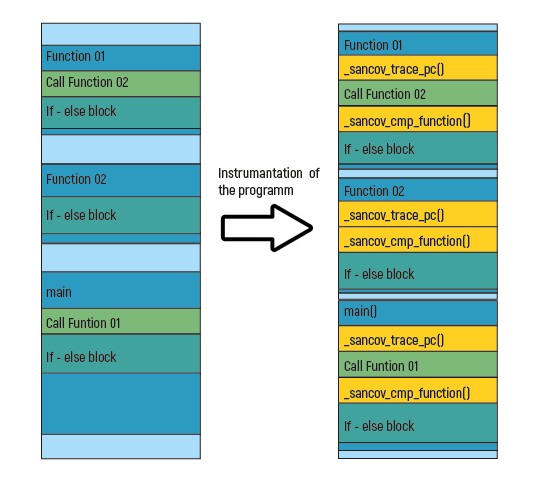
为获得覆盖率信息,可以通过代码插桩的方式,即不改变程序原有逻辑,通过向程序中插入额外的探针代码,从而获取程序执行信息。

代码插桩的方式主要分为两类:

  • 静态插桩:主要针对有目标代码源码的情况,在编译期间进行代码插桩,从而最大程度保留了程序的执行效率
  • 动态插桩:主要针对仅有二进制可执行程序的情况,在运行时动态识别指令并进行替换,这种方式会极大程度损耗程序执行效率
nipaste_2024-07-02_10-37-3

面板说明

nipaste_2024-06-19_20-23-5

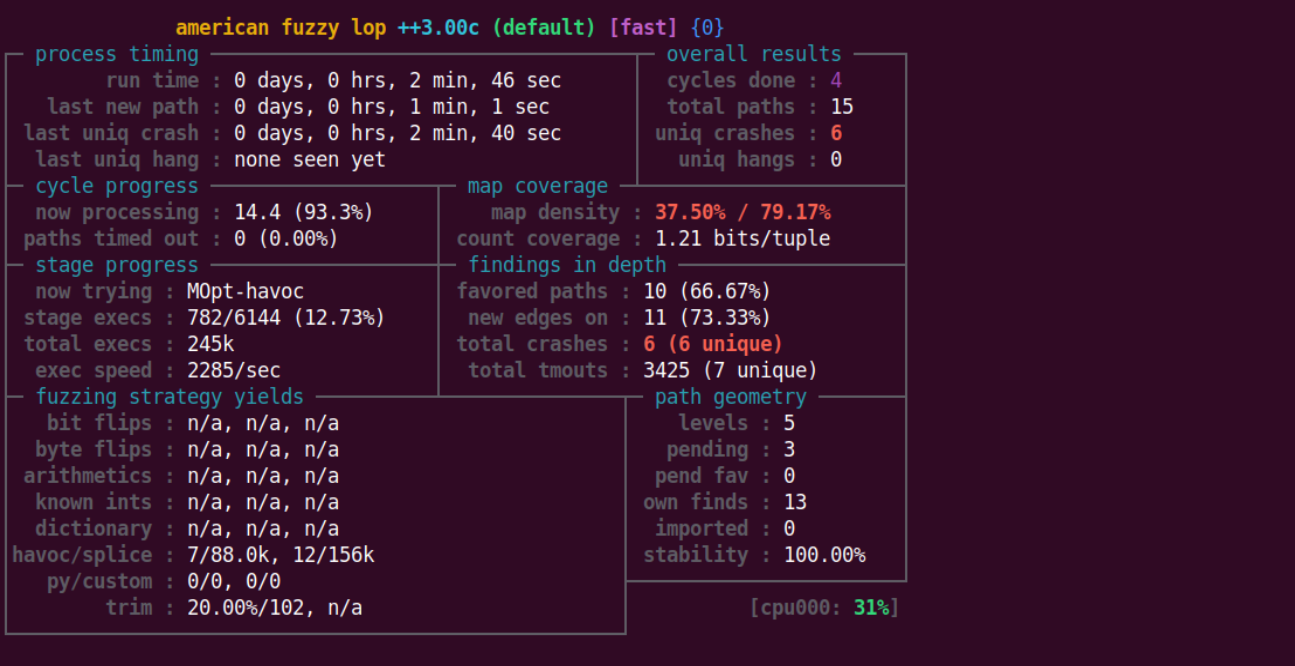
面板基本说明如下:

  • process time:总运行时间、上次发现新路径时间、上次崩溃时间、上次挂起时间
  • overall result :所有输入循环次数、总路径数、独特崩溃数、独特挂起数
  • cycle progress :当前队列循环执行情况
  • map coverage :所命中的分支元组对位图可承载的比例(当前输入/整个输入语料库)、元组命中计数
  • stage progress :正在运行的输入 类型 、当前阶段执行进度、总执行数、每秒执行数
  • findings in depth :优权路径数(与最小化算法的路径模糊器相关)、发现的新的边数、总崩溃数量、总超时数
  • fuzzing strategy yields :翻转位(从输入文件移除数量、达成该目标所需执行数、无法删除但被认为无效果的位比例,后同)、翻转字节、一些其他参数
  • path geometry :路径深度(初始输入为 level 1,每次原地生成便多加一级)、等待执行的输入(从未执行)、优权等待执行的输入、该 fuzzer 所找到的路径数、其他 fuzzer 导入的路径数(afl++ 支持多路并行)、可靠性

上述参数可以见官方文档

crash 分析

造成 crash 的输入会被做成一个个文件放在输出目录的 default/crashes 目录下:

nipaste_2024-07-03_10-17-0

也可以使用 afl-analyze 来进行crash分析

1
afl-analyze -i out/default/crashes/id:000000,sig:06,src:000003+000002,time:125963,op:splice,rep:2 ./my_harness

nipaste_2024-07-03_10-17-5

Challenge

1. AFL-training: harness

afl-traininig/harness 目录下提供给一个待测库 library.c 以及相应的头文件 library.h ,其中定义了两个待测函数:

library.h

1
2
3
4
5
6
#include <unistd.h>
// an 'nprintf' implementation - print the first len bytes of data
void lib_echo(char *data, ssize_t len);

// optimised multiply - returns x*y
int lib_mul(int x, int y);

library.c

1
2
3
4
5
6
7
8
9
10
11
12
13
14
15
16
17
18
19
20
21
22
23
24
25
26
27
28
29
30
31
32
33
34
35
36
37
38
39
40
41
#include <stdlib.h>
#include <stdio.h>
#include <string.h>
#include <assert.h>

#include "library.h"

void lib_echo(char *data, ssize_t len){
if(strlen(data) == 0) {
return;
}
char *buf = calloc(1, len);
strncpy(buf, data, len);
printf("%s",buf);
free(buf);

// A crash so we can tell the harness is working for lib_echo
if(data[0] == 'p') {
if(data[1] == 'o') {
if(data[2] =='p') {
if(data[3] == '!') {
assert(0);
}
}
}
}
}

int lib_mul(int x, int y){
if(x%2 == 0) {
return y << x;
} else if (y%2 == 0) {
return x << y;
} else if (x == 0) {
return 0;
} else if (y == 0) {
return 0;
} else {
return x * y;
}
}

写一个 wrapper 程序 harness.c ,以 lib_echo 为例,这里接收用户输入作为该函数的输入

1
2
3
4
5
6
7
8
9
10
11
12
13
14
#include <stdio.h>

#include "library.h"

int main(int argc, char **argv, char **envp)
{
char buf[0x1000];
size_t len;

len = read(0, buf, 0x1000);
lib_echo(buf, len);

return 0;
}

首先把 library.c 编译为动态链接库:

1
2
gcc -c -fPIC library.c -o library.o 
gcc -shared library.o -o library.so

然后编译

1
$ AFL_HARDEN=1 afl-clang-fast my_harness.c library.so  -o my_harness

最后将 library.so 的路径临时添加到当前的环境变量 LD_LIBRARY_PATH 中,否则没办法运行:

1
export LD_LIBRARY_PATH=$LD_LIBRARY_PATH:/root/afl-training/harness

建立一个 input 文件,随便往里面写点东西就可以进行fuzz了

1
afl-fuzz -i input/ -o out/ ./my_harness

nipaste_2024-07-02_17-43-0

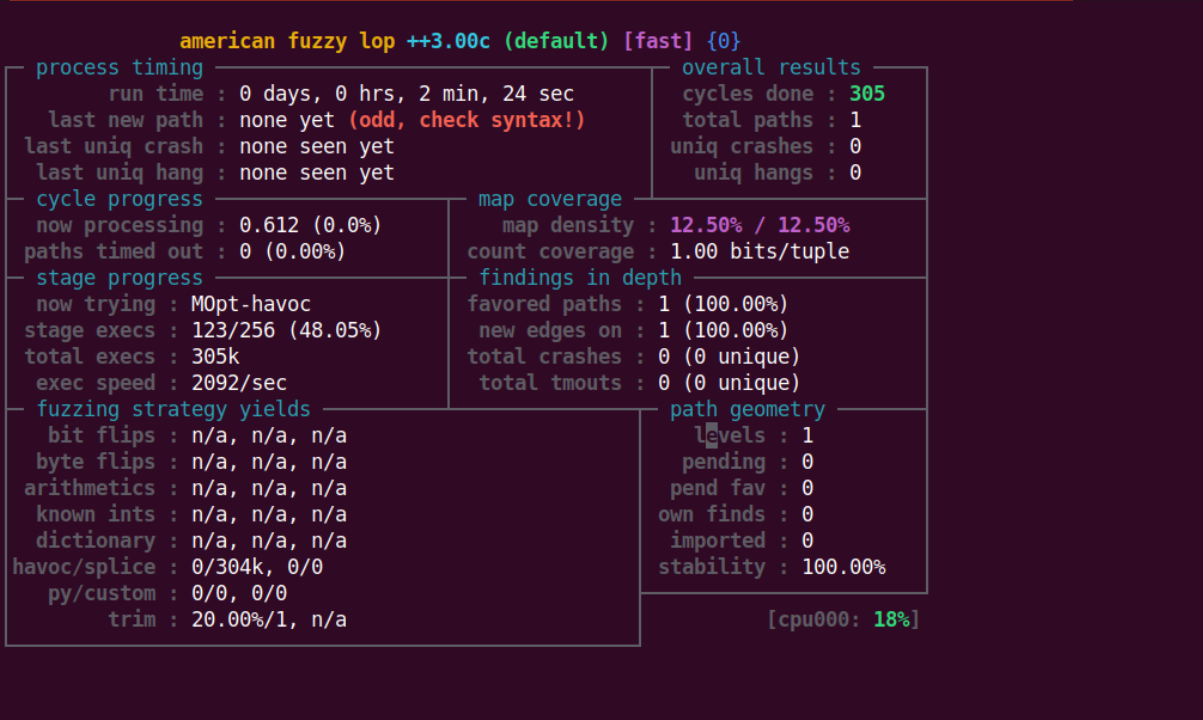
可以看到这里标红处显示不能有效 fuzz,这是因为虽然能够通过这种方式来 fuzz 动态链接库,但是没办法获取动态链接库中的代码覆盖率,因为覆盖率是通过代码插桩获得的,而仅在 my_harness.c 中进行了插桩。

实际上的使用方法可以是,将 my_harness.c 和 library.c 一起使用 afl-clang 进行编译,从而完成对待测函数进行插桩,获取覆盖率信息。

1
AFL_HARDEN=1 afl-clang-fast harness.c library.c -o my_harness

很快就会发现报错了

nipaste_2024-07-02_17-56-0

通过设置参数来实现对每个功能实现 fuzz

1
2
3
4
5
6
7
8
9
10
11
12
13
14
15
16
17
18
19
20
21
22
23
24
25
26
27
28
#include <stdio.h>
#include <string.h>
#include "library.h"

int main(int argc, char **argv){
char buf[0x1000];
int *ibuf;
int len;

if(argc < 2){
puts("I need more args");
return 0;
}

if(!strcmp(argv[1], "echo")){
len = read(0, buf, 0x1000);
lib_echo(buf, len);
}
else if(!strcmp(argv[1], "mul")){
read(0, buf, 0x8);
ibuf = (int*)buf;
lib_mul(ibuf[0], ibuf[1]);
}
else{
puts("invalid args");
}
return 0;
}

用如下命令进行编译

1
AFL_HARDEN=1 afl-clang-fast my_harness.c library.c -o harness

然后开始进行fuzz

1
afl-fuzz -i input/ -o out/ ./harness echo 

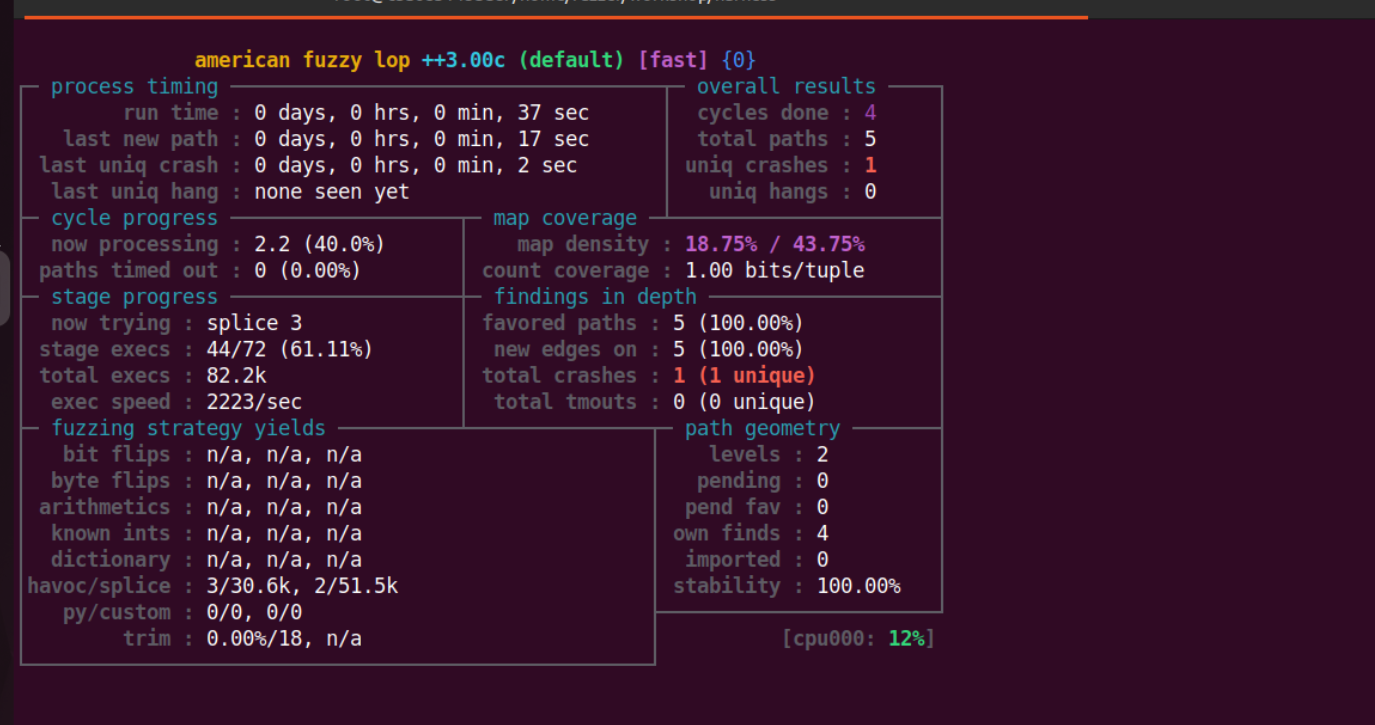
花了7分钟左右跑出了第一个crash

nipaste_2024-07-03_10-10-5

可以看到通过 fuzz 我们成功找到了能够让程序触发 assert 断言的输入。

nipaste_2024-07-19_19-46-5

2. quickstart

进入到 quickstart 目录,给了一个 vulnerable.c 文件

1
2
cd quickstart
CC=afl-clang-fast AFL_HARDEN=1 make

vulnerable.c

1
2
3
4
5
6
7
8
9
10
11
12
13
14
15
16
17
18
19
20
21
22
23
24
25
26
27
28
29
30
31
32
33
34
35
36
37
38
39
40
41
42
43
44
45
46
47
48
49
50
51
52
53
54
55
56
57
58
59
60
61
62
63
64
65
66
67
68
69
70
71
72
73
74
75
76
77
78
79
80
81
82
83
84
85
86
87
88
89
90
91
#include <string.h>
#include <stdio.h>
#include <unistd.h>
#include <stdlib.h>

#define INPUTSIZE 100

int process(char *input)
{
char *out;
char *rest;
int len;
if (strncmp(input, "u ", 2) == 0)
{ // upper case command
char *rest;
len = strtol(input + 2, &rest, 10); // how many characters of the string to upper-case
rest += 1; // skip the first char (should be a space)
out = malloc(len + strlen(input)); // could be shorter, but play it safe
if (len > (int)strlen(input))
{
printf("Specified length %d was larger than the input!\n", len);
return 1;
}
else if (out == NULL)
{
printf("Failed to allocate memory\n");
return 1;
}
for (int i = 0; i != len; i++)
{
char c = rest[i];
if (c > 96 && c < 123) // ascii a-z
{
c -= 32;
}
out[i] = c;
}
out[len] = 0;
strcat(out, rest + len); // append the remaining text
printf("%s", out);
free(out);
}
else if (strncmp(input, "head ", 5) == 0)
{ // head command
if (strlen(input) > 6)
{
len = strtol(input + 4, &rest, 10);
rest += 1; // skip the first char (should be a space)
rest[len] = '\0'; // truncate string at specified offset
printf("%s\n", rest);
}
else
{
fprintf(stderr, "head input was too small\n");
}
}
else if (strcmp(input, "surprise!\n") == 0)
{
// easter egg!
*(char *)1 = 2;
}
else
{
return 1;
}
return 0;
}

int main(int argc, char *argv[])
{
char *usage = "Usage: %s\n"
"Text utility - accepts commands and data on stdin and prints results to stdout.\n"
"\tInput | Output\n"
"\t------------------+-----------------------\n"
"\tu <N> <string> | Uppercased version of the first <N> bytes of <string>.\n"
"\thead <N> <string> | The first <N> bytes of <string>.\n";
char input[INPUTSIZE] = {0};

// Slurp input
if (read(STDIN_FILENO, input, INPUTSIZE) < 0)
{
fprintf(stderr, "Couldn't read stdin.\n");
}

int ret = process(input);
if (ret)
{
fprintf(stderr, usage, argv[0]);
};
return ret;
}

简单来说实现了两个功能,其中一个是指定需要将字符串中需要将小写转换为大写的长度,另外一个是指定位置对字符串进行截断。其实还有一个隐藏功能,就是输入 surprise!\n 时,会触发内存引用错误。

注意事项:实际上前两个功能,也都存在漏洞,通过 fuzz 可以找到这些洞。

nipaste_2024-07-19_22-11-1

正常测试下,其功能如上所示。

接下来尝试对目标进行 fuzz

1
2
AFL_HARDEN=1 afl-clang-fast vulnerable.c -o vuln
afl-fuzz -i inputs -o out ./vuln

nipaste_2024-07-19_22-14-1

简单测试一下

nipaste_2024-07-19_22-14-4

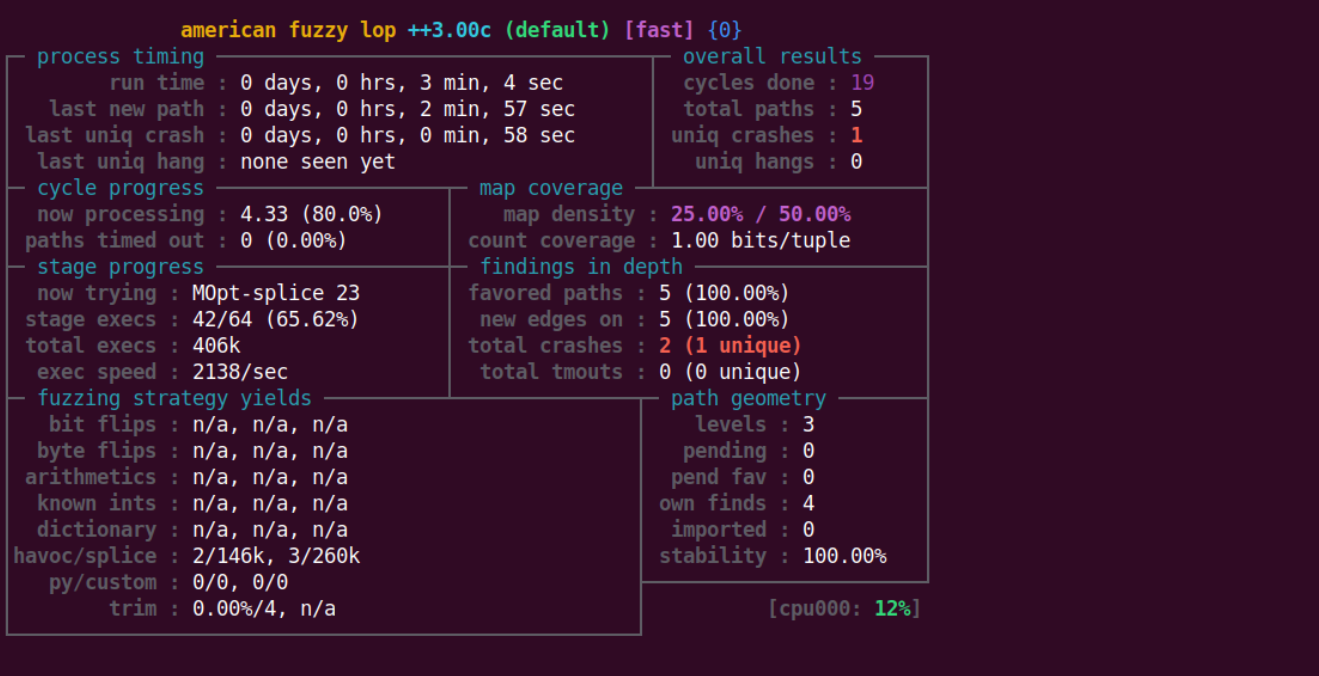
nipaste_2024-07-19_22-15-0

这里使用的是第一个功能,由于 len 被设置为了 0,所以在 strcat 的时候,会破坏 top chunk size,因此程序会崩溃。

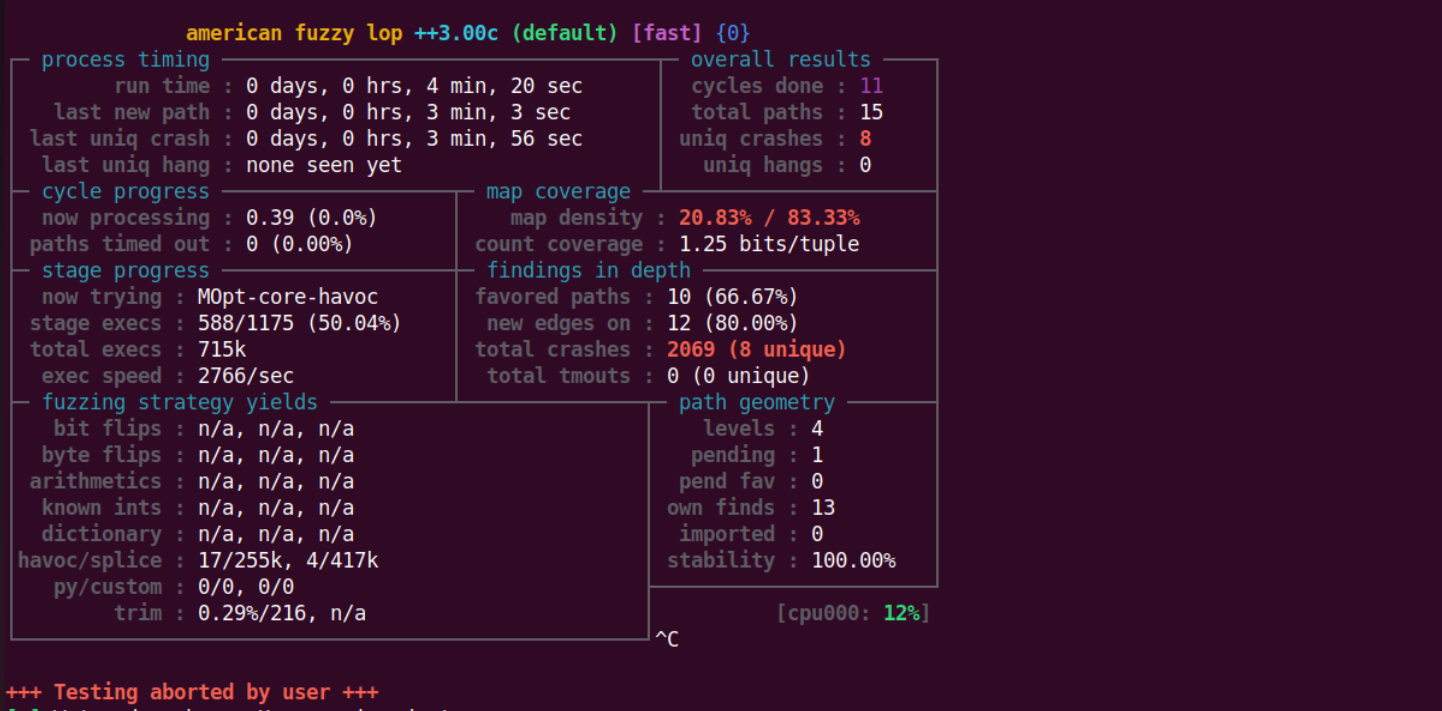
简单测试了一下,大概的错误类型如下,由于跑的时间比较短,所以输入为 surprise!\n 时的洞没有跑出来。
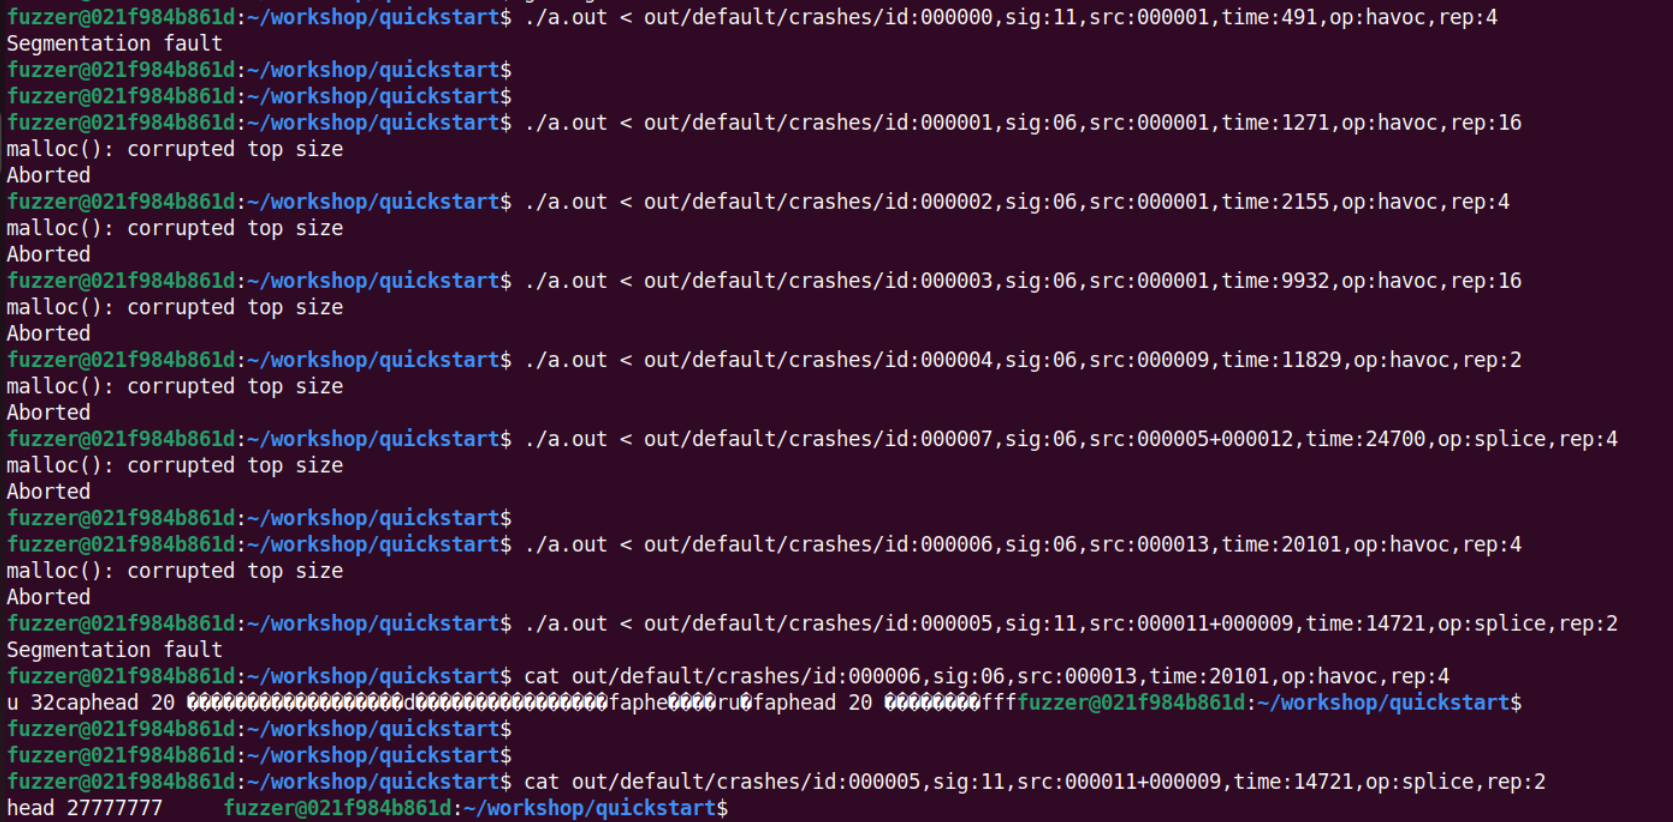
nipaste_2024-07-19_23-50-0

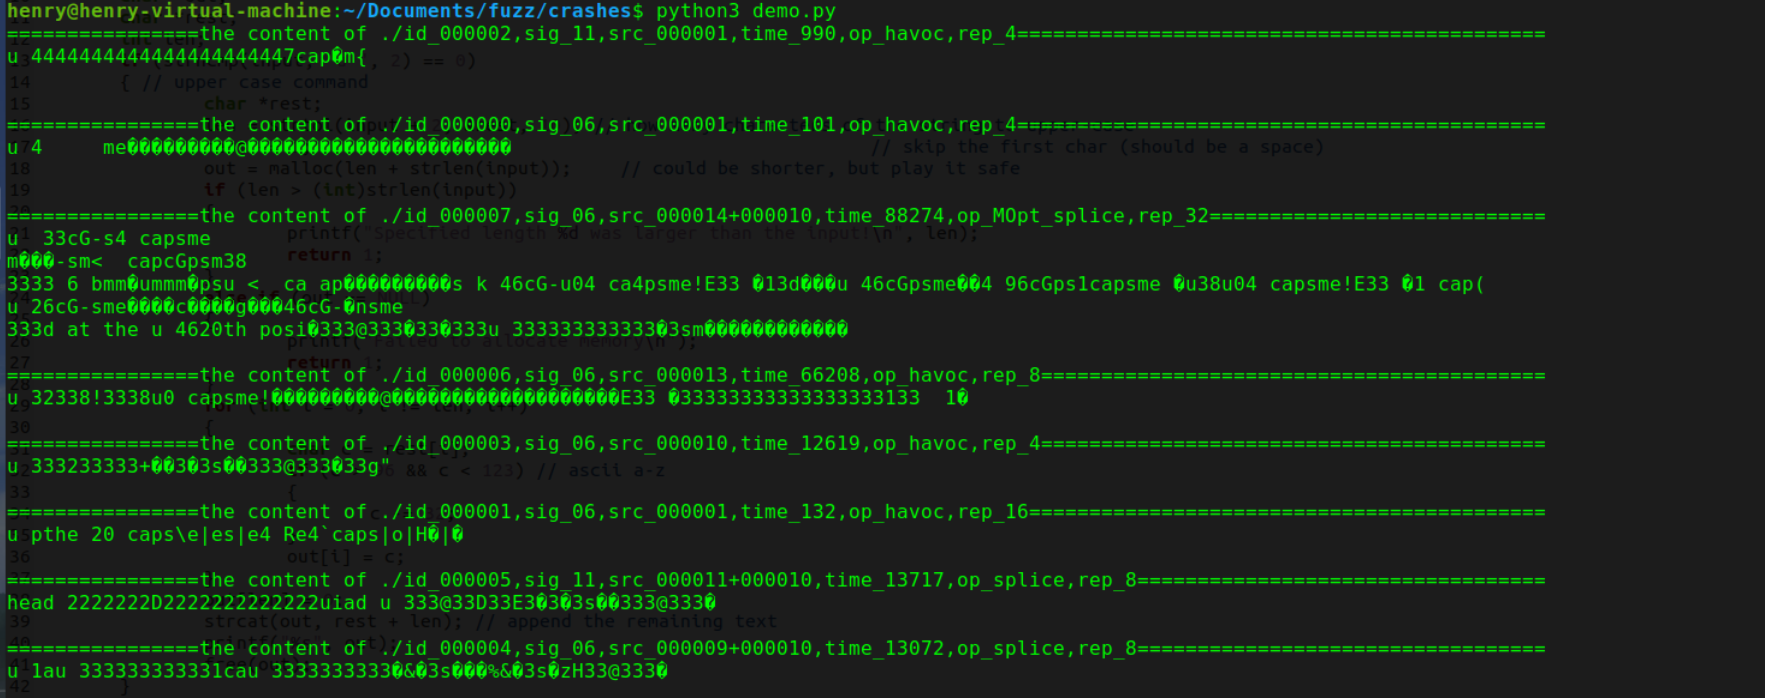
但从上面的输出来看,关于 u 和 head 这两个功能的洞算是都跑出来了,前面已经分析过 u功能 的漏洞了,这里在看一下 head 功能 的漏洞,即 id5。

上面的方法比较笨,这里我们可以直接调用下面的脚本来查看具体的crashes文件内容

1
2
3
4
5
6
7
8
9
10
11
12
13
14
15
16
17
18
19
20
import os
import subprocess

def cat_files_in_directory(directory_path):
# 获取目录下的所有文件名
files = [os.path.join(directory_path, f) for f in os.listdir(directory_path) if os.path.isfile(os.path.join(directory_path, f))]

# 逐个文件执行cat命令
i = 0
for file in files:
if "id" in file:
filename = f"================the content of {file}".ljust(0x80, "=")
print(filename)
subprocess.run(['cat', file])
i += 1
print("\n")

# 指定目录路径
directory_path = 'out_1/default/crashes'
cat_files_in_directory(directory_path)

nipaste_2024-07-20_00-31-2

这样看起来就快多了,同时我们也可以把 cat 换成执行指令,查看执行的效果都是些什么错误

由于docker里面gdb环境不如pwndbg,这里可以直接从docker里面的crash文件拿出来,本地做分析,命令如下。

1
docker cp <containerId>:/path/to/file/in/container /path/to/destination/on/host

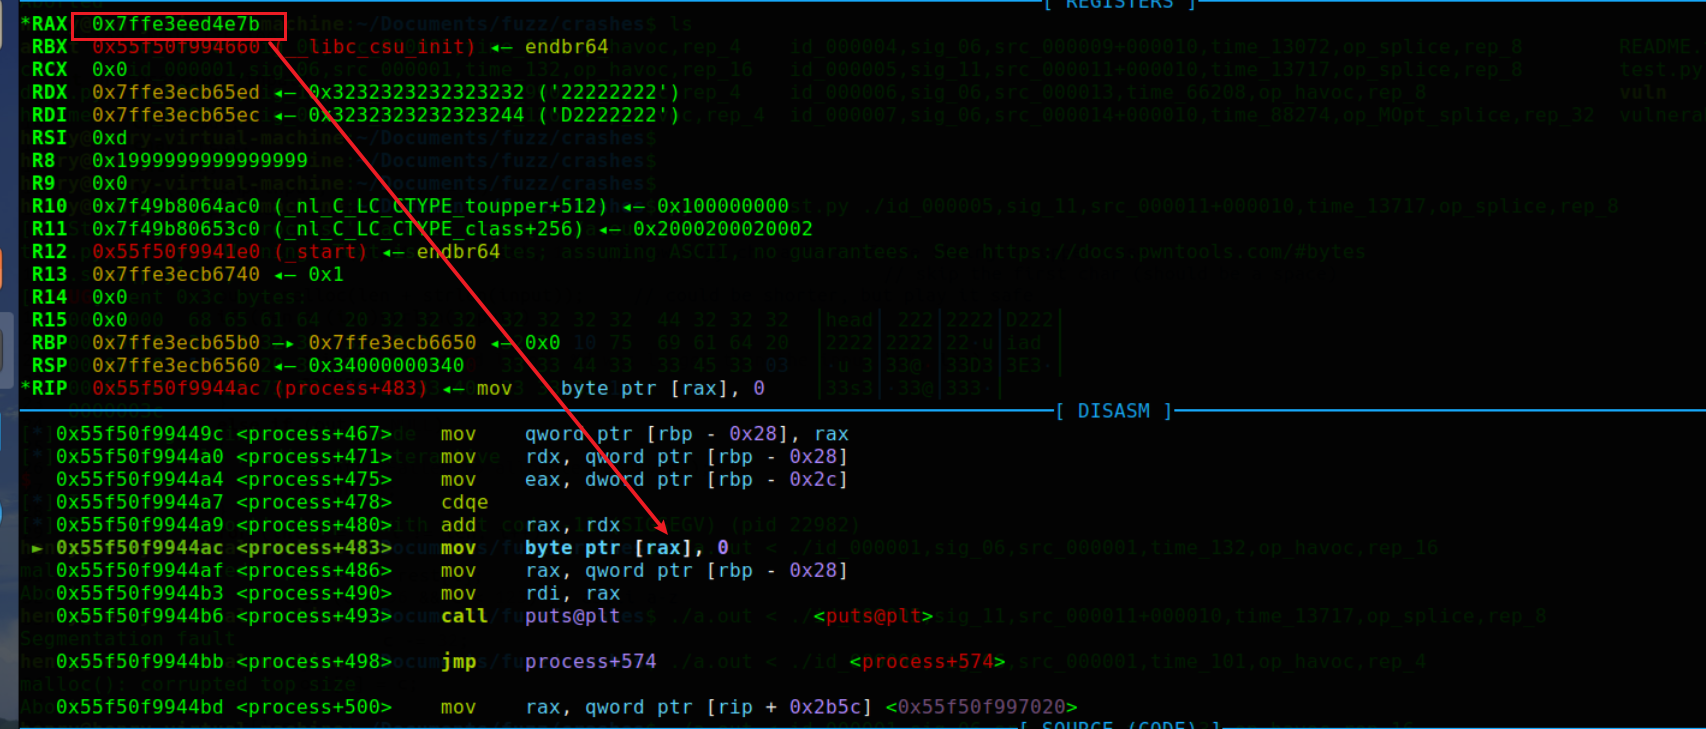
由于 head 后的数字较大,导致len过大,从而在rest[len] = '\0'时内存地址溢出,从而发生错误。
nipaste_2024-07-20_00-37-2

3. Libxml2

在介绍这一部分内容之前,首先来简单说明一下什么持久模式

persistent mode

关于持久模式(persistent mode)的说明文档见这里 ,简单翻译如下

在持久模式下,AFL++ 在单个进程中多次模糊测试目标,而不是每次执行模糊测试时都fork一个新进程。这是最有效的模糊测试方法,因为速度可以轻松提高 10 倍或 20 倍,且没有任何缺点。所有专业模糊测试都使用此模式。

持久模式要求目标可以在一个或多个函数中调用,并且其状态可以完全重置,以便可以执行多次调用而不会发生资源泄漏,并且之前的运行不会对将来的运行产生影响。

举一个例子就是

1
2
3
4
5
6
7
8
9
10
11
12
13
14
15
16
17
18
19
20
21
22
23
24
25
26
27
28
29
30
31
32
#include "what_you_need_for_your_target.h"

__AFL_FUZZ_INIT();

main() {

// anything else here, e.g. command line arguments, initialization, etc.

#ifdef __AFL_HAVE_MANUAL_CONTROL
__AFL_INIT();
#endif

unsigned char *buf = __AFL_FUZZ_TESTCASE_BUF; // must be after __AFL_INIT
// and before __AFL_LOOP!

while (__AFL_LOOP(10000)) {

int len = __AFL_FUZZ_TESTCASE_LEN; // don't use the macro directly in a
// call!

if (len < 8) continue; // check for a required/useful minimum input length

/* Setup function call, e.g. struct target *tmp = libtarget_init() */
/* Call function to be fuzzed, e.g.: */
target_function(buf, len);
/* Reset state. e.g. libtarget_free(tmp) */

}

return 0;

}

原本我们可能需要通过标准输入或者文件输入将内容输入到 buf 中,然后调用 target_function,实际上这样的情况下,每一次这样的过程都是需要一次 fork 系统调用,这增加了内核的开销,所以我们通过设置 __AFL_LOOP(10000),可以在保证单个进程持续对目标进行 fuzz,而且会自动更新 buf 的内容。

上面部分宏定义参考如下(以下宏定义能够在没有 afl-clang-fast/lto 的情况下编译目标):

1
2
3
4
5
6
7
8
9
#ifndef __AFL_FUZZ_TESTCASE_LEN
ssize_t fuzz_len;
#define __AFL_FUZZ_TESTCASE_LEN fuzz_len
unsigned char fuzz_buf[1024000];
#define __AFL_FUZZ_TESTCASE_BUF fuzz_buf
#define __AFL_FUZZ_INIT() void sync(void);
#define __AFL_LOOP(x) ((fuzz_len = read(0, fuzz_buf, sizeof(fuzz_buf))) > 0 ? 1 : 0)
#define __AFL_INIT() sync()
#endif

Deferred initialization

AFL++ 通过确保目标程序只执行一次(在main函数之前停下来,然后克隆当前进程对目标fuzz)来优化性能,这在一定程度上确实优化了性能,但是程序中往往还会存在其他比较耗时性的操作,如在 main 函数开始处解析一个大型的配置文件,那实际上每个fork出来的每个进程又要花时间去解析这些文件,这在一定程度上是非常耗时的,所以说延迟初始化的作用就体现出了。

注意事项:延迟初始化的位置如果选择的不对,可能会让程序出现故障,如下就是一些可能出现故障的例子:

  • 创建任何重要的线程或子进程 - 因为 forkserver 无法轻易克隆它们。
  • setitimer()通过或等效调用来初始化计时器。
  • 创建临时文件、网络套接字、偏移敏感文件描述符以及类似的共享状态资源 - 但前提是它们的状态对程序以后的行为有显著影响。
  • 对模糊输入的任何访问,包括读取有关其大小的元数据

选择位置后,在适当的位置添加以下代码:

1
2
3
#ifdef __AFL_HAVE_MANUAL_CONTROL
__AFL_INIT();
#endif

这里使用 #ifdef 进行保护,但包含它们可确保程序在使用 afl-clang-fast/afl-clang-lto/afl-gcc-fast 以外的工具编译时继续正常工作。

Persistent mode

该操作的基本结构如下:

1
2
3
4
5
6
7
8
9
while (__AFL_LOOP(1000)) {

/* Read input data. */
/* Call library code to be fuzzed. */
/* Reset state. */

}

/* Exit normally. */

为什么说这个循环里面一般会放一些无状态的 API 呢,或者怎么理解这个无状态,简单理解就是,这里的操作不会影响后续的一些操作,可以一直重置状态。这里的重置状态就是我们每次 call func 结束之后,可以立马更新数据,进入到下一次同样的操作中,下面的指令就是一个例子。

1
2
3
4
5
6
7
while (__AFL_LOOP(1000)) {
int len = __AFL_FUZZ_TESTCASE_LEN;
xmlDocPtr doc = xmlReadMemory((char *)buf, len, "https://mykter.com", NULL, 0);
if (doc != NULL) {
xmlFreeDoc(doc);
}
}

Shared memory fuzzing

通过共享内存的方式又可以极大的提高 fuzz 的效率,这一点理解上不难,简单来说省去了每一次过程中分配内存

,释放内存等耗时操作,具体使用如下。

#include 指令之后,main 函数之前可以设置下面的命令。

1
__AFL_FUZZ_INIT();

设置共享内存,放在 __AFL_LOOP 之前

1
unsigned char *buf = __AFL_FUZZ_TESTCASE_BUF;

下面这个命令放在__AFL_LOOP 循环的第一行

1
int len = __AFL_FUZZ_TESTCASE_LEN;

下面就言归正传来看这道题目

环境搭建

1
2
3
4
5
6
7
8
git submodule init && git submodule update
cd libxml2
CC=afl-clang-fast ./autogen.sh # you could also use afl-clang-lto, which is usally the better choice, but - oddly - in this case it takes longer to find the bug with an lto build.
AFL_USE_ASAN=1 make -j 4
# ./testModule # if you have compiled with ASAN, the tests fail - there are illegal memory accesses in the built-in test harness!
# leak detection doesn't work in an unprivileged container as it can't attach to the process.
# Run with ASAN_OPTIONS=detect_leaks=0 set to disable this ASAN feature, e.g.
# ASAN_OPTIONS=detect_leaks=0 ./testModule

harness1.c

第一种写法的 harness 如下,这里我们不使用前面提到的任何优化

1
2
3
4
5
6
7
8
9
10
11
12
13
14
15
16
#include "libxml/parser.h"
#include "libxml/tree.h"

int main(int argc, char **argv) {
if (argc != 2){
return(1);
}
xmlInitParser();
xmlDocPtr doc = xmlReadFile(argv[1], NULL, 0);
if (doc != NULL) {
xmlFreeDoc(doc);
}
xmlCleanupParser();

return(0);
}

编译 harness.c

1
AFL_USE_ASAN=1 afl-clang-fast ./harness.c -I libxml2/include libxml2/.libs/libxml2.a -lz -lm -o harness

初始输入seed

1
2
mkdir input
echo "<hi></hi>" > input/hi.xml

设置好fuzz的字典然后就可以开始跑了,@@用来表示占位

1
afl-fuzz -i input -o out -x /home/fuzzer/AFLplusplus/dictionaries/xml.dict ./harness @@

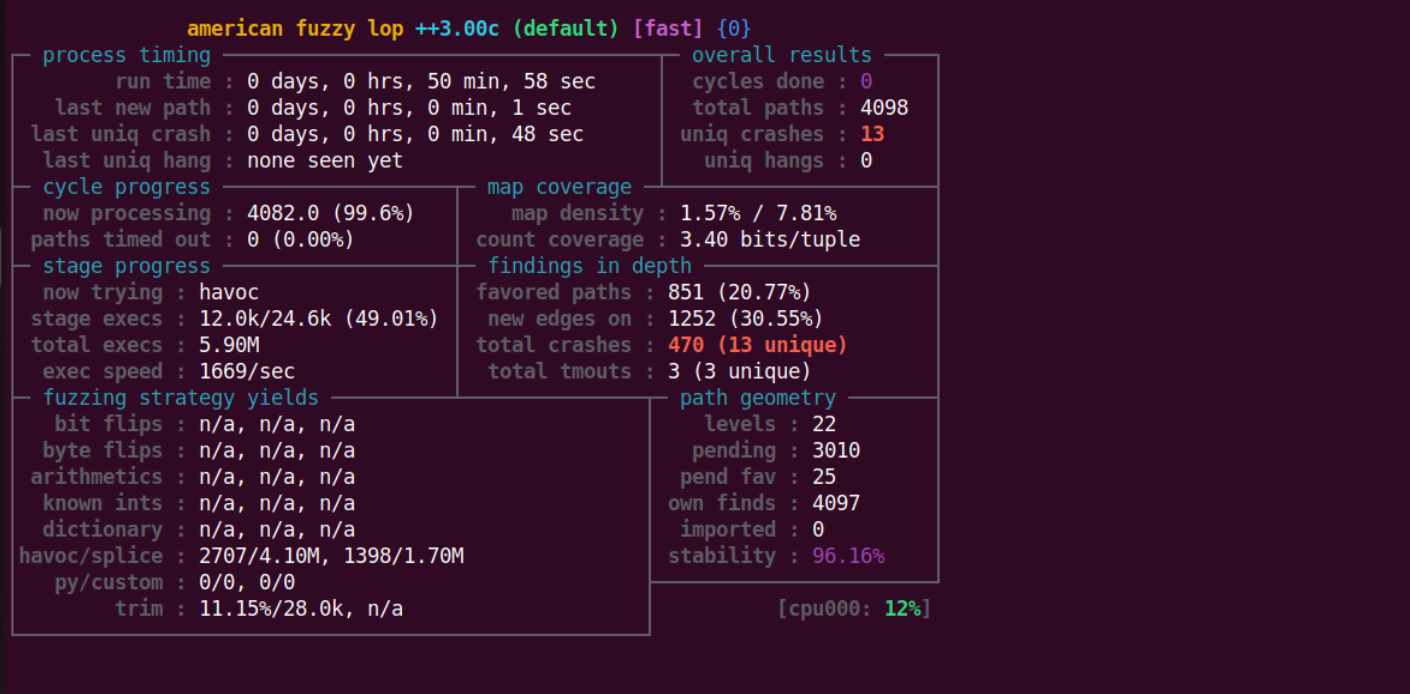
然后将近 50 分钟的时间跑出来了13个crash。

nipaste_2024-07-20_11-36-5

harness2.c

第二种写法 harness 如下,这里我们把前面提到的优化全部加入进来,在看看速度怎么样

1
2
3
4
5
6
7
8
9
10
11
12
13
14
15
16
17
18
19
20
21
22
23
24
#include "libxml/parser.h"
#include "libxml/tree.h"
#include <unistd.h>

__AFL_FUZZ_INIT();

int main(int argc, char **argv) {
#ifdef __AFL_HAVE_MANUAL_CONTROL
__AFL_INIT();
#endif
unsigned char *buf = __AFL_FUZZ_TESTCASE_BUF; // must be after __AFL_INIT

xmlInitParser();
while (__AFL_LOOP(1000)) {
int len = __AFL_FUZZ_TESTCASE_LEN;
xmlDocPtr doc = xmlReadMemory((char *)buf, len, "https://mykter.com", NULL, 0);
if (doc != NULL) {
xmlFreeDoc(doc);
}
}
xmlCleanupParser();

return(0);
}

编译 harness.c

1
AFL_USE_ASAN=1 afl-clang-fast ./harness.c -I libxml2/include libxml2/.libs/libxml2.a -lz -lm -o harness

初始输入seed

1
2
mkdir input
echo "<hi></hi>" > input/hi.xml

设置好fuzz的字典然后就可以开始跑了,@@用来表示占位

1
afl-fuzz -i input -o out -x /home/fuzzer/AFLplusplus/dictionaries/xml.dict ./harness @@

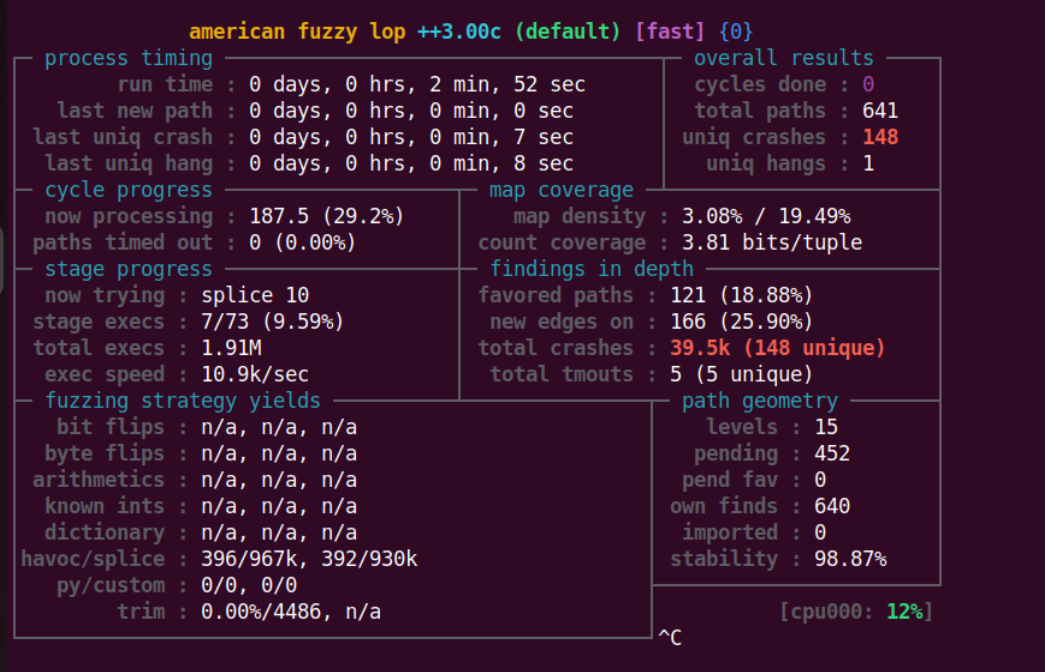
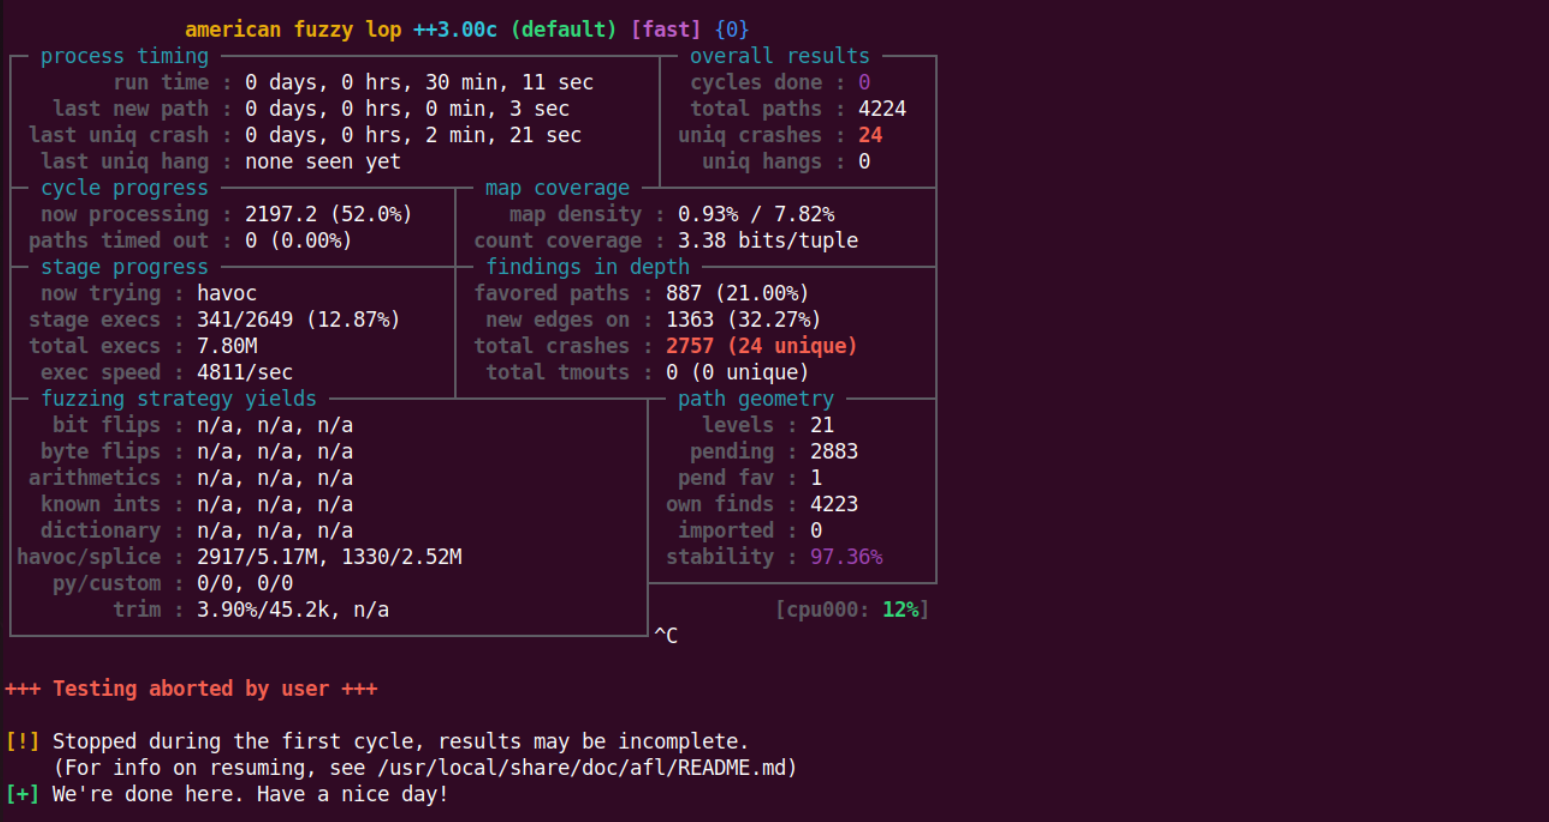
30分钟的时间爆了24个crash,可以看到在同样的路径探索基础上时间上是比前面的少了20分钟。
nipaste_2024-07-20_12-10-5

拿出里面的一个进行分析

nipaste_2024-07-03_16-49-3

1
./fuzzer < out/default/crashes/id:000013,sig:06,src:004587,time:4576851,op:havoc,rep:8

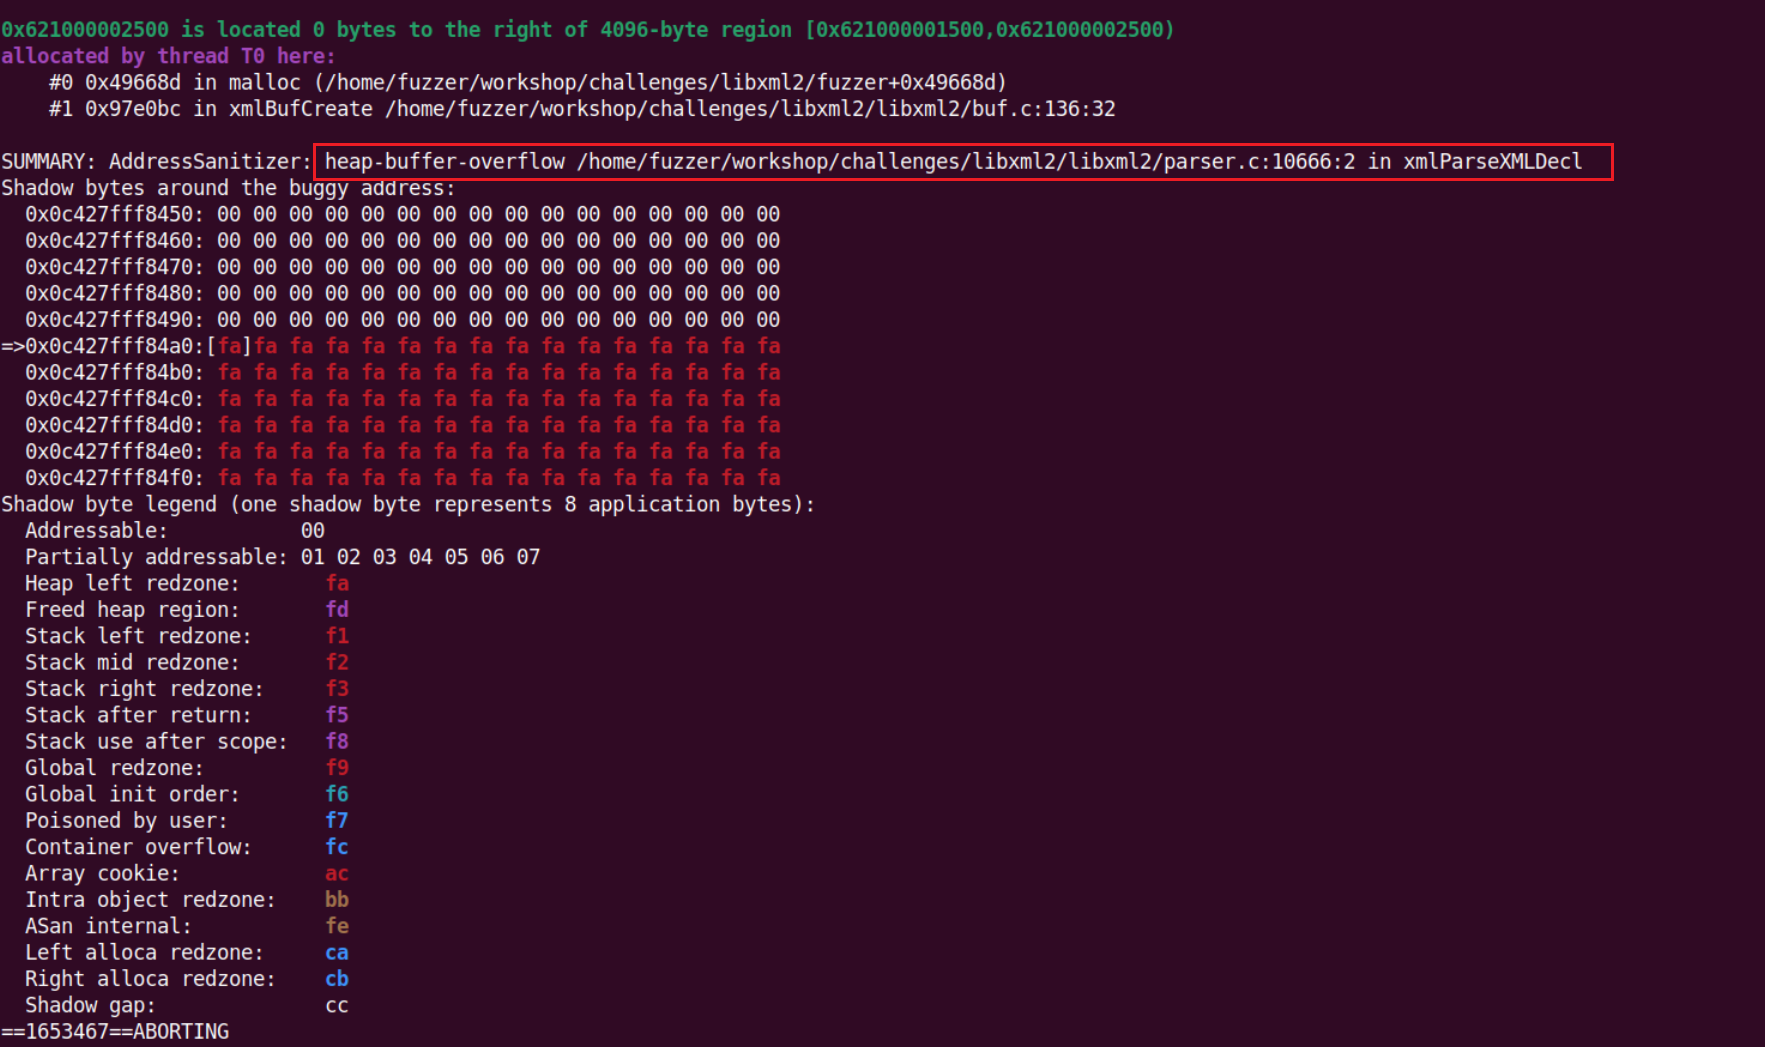
但仔细分析实际上这18个都是同一个地方,可以用 ASAN 打印出相关的漏洞信息
nipaste_2024-07-04_09-49-0

注意事项:这篇文章重心会放在学习 AFL++ 的特性上,对于具体的漏洞分析有兴趣的读者可以自行实践尝试。

4. heartbleed

题目为了降低难度,直接给了一个 handshake.cc 文件,我们需要做的就是修改这个文件来使得其成为一个 harness,从而可以对目标进行fuzz。

环境搭建

1
2
3
cd openssl
CC=afl-clang-fast CXX=afl-clang-fast++ ./config -d
AFL_USE_ASAN=1 make

handshake.cc

借助 gpt 完成了对源码中内容的解释

1
2
3
4
5
6
7
8
9
10
11
12
13
14
15
16
17
18
19
20
21
22
23
24
25
26
27
28
29
30
31
32
33
34
35
36
37
38
39
40
41
42
43
44
45
46
47
48
49
50
51
52
53
54
55
56
57
58
59
60
// 版权声明,表示这段代码是Google Inc.版权所有,并且遵循Apache License 2.0版本。
#include <openssl/ssl.h> // 包含OpenSSL库的SSL功能头文件。
#include <openssl/err.h> // 包含OpenSSL库的错误处理头文件。
#include <assert.h> // 包含断言库,用于在运行时进行错误检查。
#include <stdint.h> // 包含标准整数类型定义。
#include <stddef.h> // 包含标准定义库。
#include <unistd.h> // 包含UNIX标准库。

// 如果没有定义CERT_PATH宏,则定义一个空的CERT_PATH宏。
#ifndef CERT_PATH
# define CERT_PATH
#endif

// 初始化SSL上下文的函数。
SSL_CTX *Init() {
SSL_library_init(); // 初始化SSL库。
SSL_load_error_strings(); // 加载SSL错误信息。
ERR_load_BIO_strings(); // 加载BIO错误信息。
OpenSSL_add_all_algorithms(); // 添加所有加密算法。

SSL_CTX *sctx;
// 创建新的SSL上下文,使用TLSv1方法,并断言成功。
assert (sctx = SSL_CTX_new(TLSv1_method()));

// 下面两个文件是用以下命令创建的:
// openssl req -x509 -newkey rsa:512 -keyout server.key \
// -out server.pem -days 9999 -nodes -subj /CN=a/

// 加载服务器证书文件,并断言成功。
assert(SSL_CTX_use_certificate_file(sctx, "server.pem",
SSL_FILETYPE_PEM));
// 加载服务器私钥文件,并断言成功。
assert(SSL_CTX_use_PrivateKey_file(sctx, "server.key",
SSL_FILETYPE_PEM));
return sctx; // 返回初始化的SSL上下文。
}

// 主函数,程序入口。
int main() {
// 初始化SSL上下文,并将其设置为静态变量。
static SSL_CTX *sctx = Init();
// 创建新的SSL对象。
SSL *server = SSL_new(sctx);
// 创建新的内存BIO,用于SSL输入和输出。
BIO *sinbio = BIO_new(BIO_s_mem());
BIO *soutbio = BIO_new(BIO_s_mem());
// 将内存BIO设置为SSL对象的输入和输出。
SSL_set_bio(server, sinbio, soutbio);
// 将SSL对象设置为接受状态。
SSL_set_accept_state(server);

// TODO: 为了模拟握手的一端,我们需要在这里向sinbio写入数据。
BIO_write(sinbio, data, size); // 向sinbio写入数据。

// 执行SSL握手。
SSL_do_handshake(server);
// 释放SSL对象。
SSL_free(server);
return 0; // 返回0,表示程序成功执行。
}

有了前面 fuzz 的经验,我们知道为了对目标进行 fuzz,需要找到一个可以控制的数据输入点,那么在这道题中,可以很明显看到上面的 BIO_write(sinbio, data, size); 这一行会对设置的内存 BIO 数据区进行输入,从而完成后面的交互。

handshake.cc 1.0 版

下面的这个示例是不使用 persistent mode 的 harness

1
2
3
4
5
6
7
8
9
10
11
12
13
14
15
16
17
18
19
20
21
22
23
24
25
26
27
28
29
30
31
32
33
34
35
36
37
38
39
40
41
42
43
44
45
46
47
48
49
50
51
52
53
// Copyright 2016 Google Inc. All Rights Reserved.
// Licensed under the Apache License, Version 2.0 (the "License");
#include <openssl/ssl.h>
#include <openssl/err.h>
#include <assert.h>
#include <stdint.h>
#include <stddef.h>
#include <unistd.h>

#ifndef CERT_PATH
# define CERT_PATH
#endif

SSL_CTX *Init() {
SSL_library_init();
SSL_load_error_strings();
ERR_load_BIO_strings();
OpenSSL_add_all_algorithms();
SSL_CTX *sctx;
assert (sctx = SSL_CTX_new(TLSv1_method()));
/* These two file were created with this command:
openssl req -x509 -newkey rsa:512 -keyout server.key \
-out server.pem -days 9999 -nodes -subj /CN=a/
*/
assert(SSL_CTX_use_certificate_file(sctx, "server.pem",
SSL_FILETYPE_PEM));
assert(SSL_CTX_use_PrivateKey_file(sctx, "server.key",
SSL_FILETYPE_PEM));
return sctx;
}

int main() {

static SSL_CTX *sctx = Init();
SSL *server = SSL_new(sctx);
BIO *sinbio = BIO_new(BIO_s_mem());
BIO *soutbio = BIO_new(BIO_s_mem());
SSL_set_bio(server, sinbio, soutbio);
SSL_set_accept_state(server);

/* TODO: To spoof one end of the handshake, we need to write data to sinbio
* here */
#ifdef __AFL_HAVE_MANUAL_CONTROL
__AFL_INIT();
#endif
unsigned char data[1000];
int size = read(STDIN_FILENO, data, 1000);
BIO_write(sinbio, data, size);

SSL_do_handshake(server);
SSL_free(server);
return 0;
}

编译命令

1
AFL_USE_ASAN=1 afl-clang-fast++ -g handshake.cc openssl/libssl.a openssl/libcrypto.a -o handshake -I openssl/include -ldl

开始fuzz

1
afl-fuzz -i in -o out ./handshake

注意:种子可以随便设置,对于这道题 afl 还是可以找到 crash 的。

handshake.cc 2.0 版

使用 persistent mode 的 harness 如下

1
2
3
4
5
6
7
8
9
10
11
12
13
14
15
16
17
18
19
20
21
22
23
24
25
26
27
28
29
30
31
32
33
34
35
36
37
38
39
40
41
42
43
44
45
46
47
48
49
50
51
52
53
54
55
56
57
58
// Copyright 2016 Google Inc. All Rights Reserved.
// Licensed under the Apache License, Version 2.0 (the "License");
#include <openssl/ssl.h>
#include <openssl/err.h>
#include <assert.h>
#include <stdint.h>
#include <stddef.h>
#include <unistd.h>

#ifndef CERT_PATH
# define CERT_PATH
#endif

SSL_CTX *Init() {
SSL_library_init();
SSL_load_error_strings();
ERR_load_BIO_strings();
OpenSSL_add_all_algorithms();
SSL_CTX *sctx;
assert (sctx = SSL_CTX_new(TLSv1_method()));
/* These two file were created with this command:
openssl req -x509 -newkey rsa:512 -keyout server.key \
-out server.pem -days 9999 -nodes -subj /CN=a/
*/
assert(SSL_CTX_use_certificate_file(sctx, "server.pem",
SSL_FILETYPE_PEM));
assert(SSL_CTX_use_PrivateKey_file(sctx, "server.key",
SSL_FILETYPE_PEM));
return sctx;
}

__AFL_FUZZ_INIT();

int main() {

static SSL_CTX *sctx = Init();
SSL *server = SSL_new(sctx);
BIO *sinbio = BIO_new(BIO_s_mem());
BIO *soutbio = BIO_new(BIO_s_mem());
SSL_set_bio(server, sinbio, soutbio);
SSL_set_accept_state(server);

/* TODO: To spoof one end of the handshake, we need to write data to sinbio
* here */
#ifdef __AFL_HAVE_MANUAL_CONTROL
__AFL_INIT();
#endif

unsigned char *data = __AFL_FUZZ_TESTCASE_BUF;;
while(__AFL_LOOP(1000)){
int size = __AFL_FUZZ_TESTCASE_LEN;
BIO_write(sinbio, data, size);
SSL_do_handshake(server);
}

SSL_free(server);
return 0;
}

同样的编译和fuzz命令,两者的比较图如下:

正常模式下

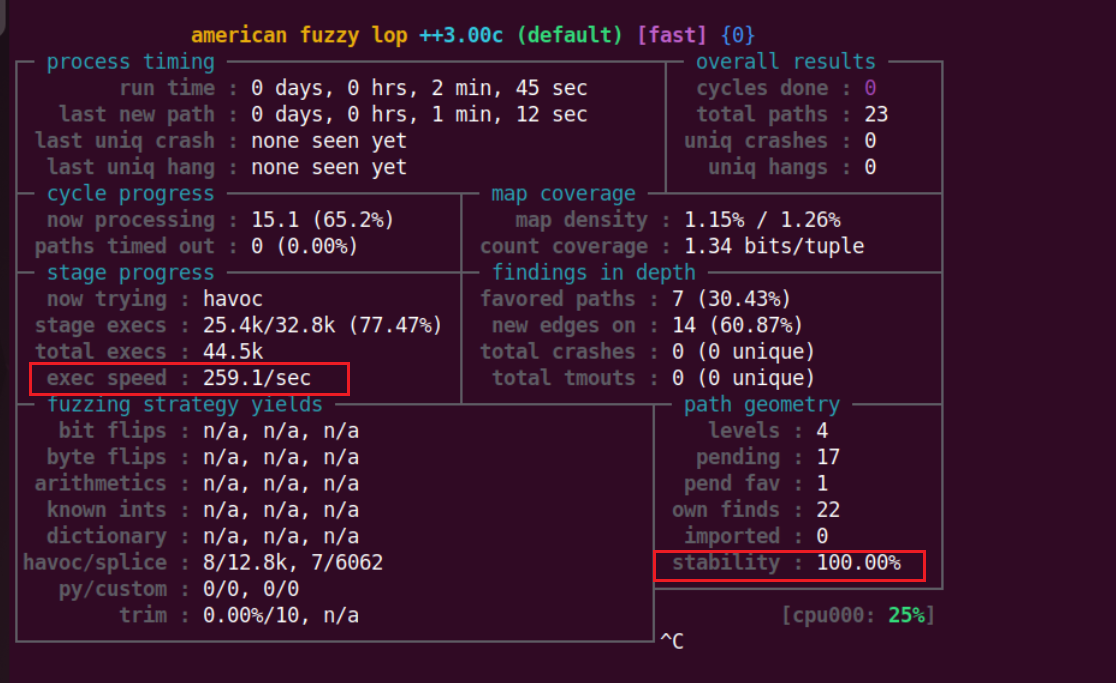
nipaste_2024-07-20_13-16-4

持久模式

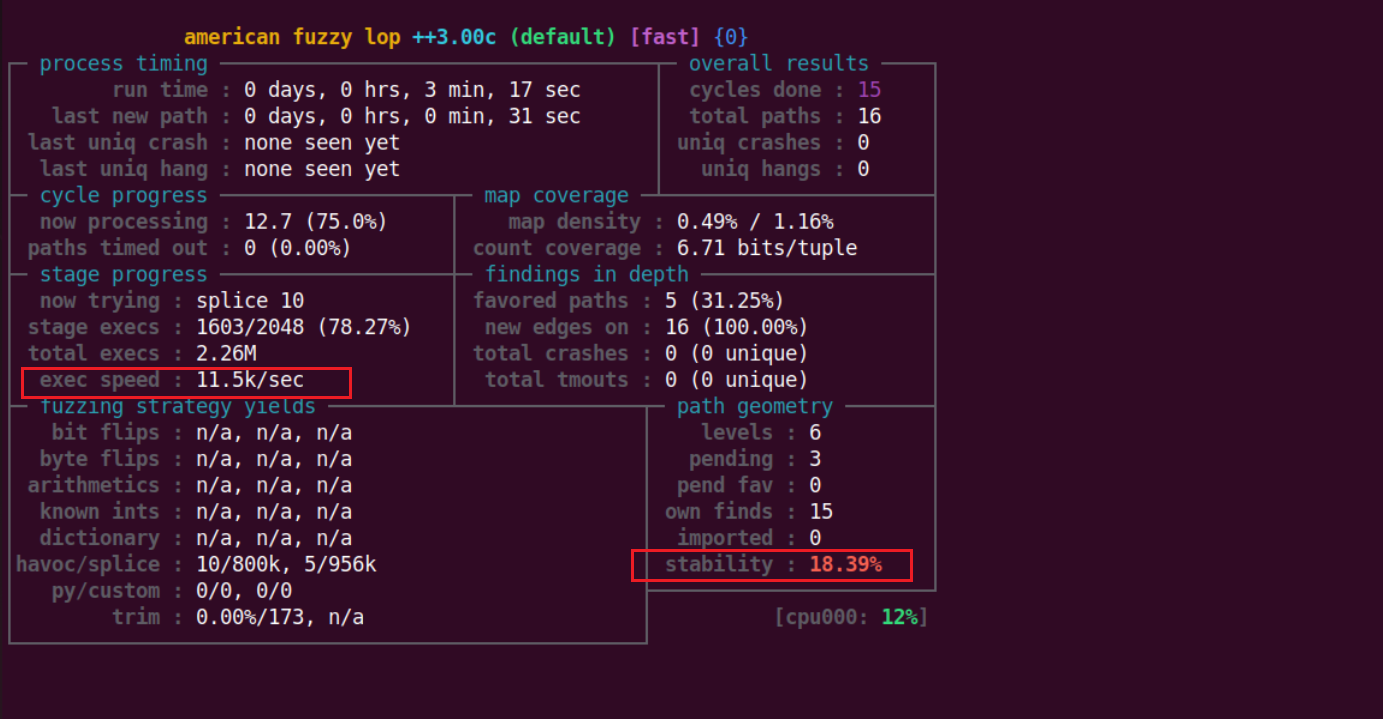
nipaste_2024-07-20_13-17-3

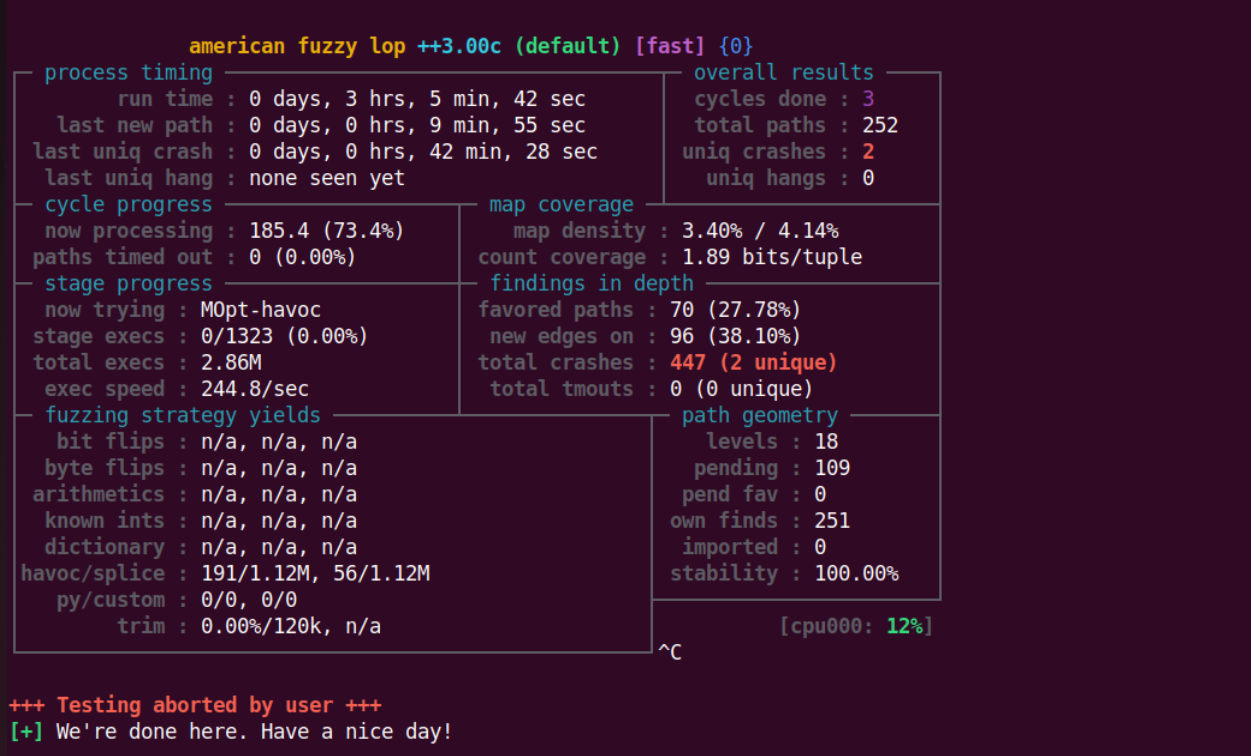
可以看到持久模式虽然执行速度很快,但其稳定性很低,这不方便我们分析测试目标,所以说这里依然采用稳定的方式进行fuzz。

经过一段时间之后出来了两个crash。
nipaste_2024-07-20_16-34-1

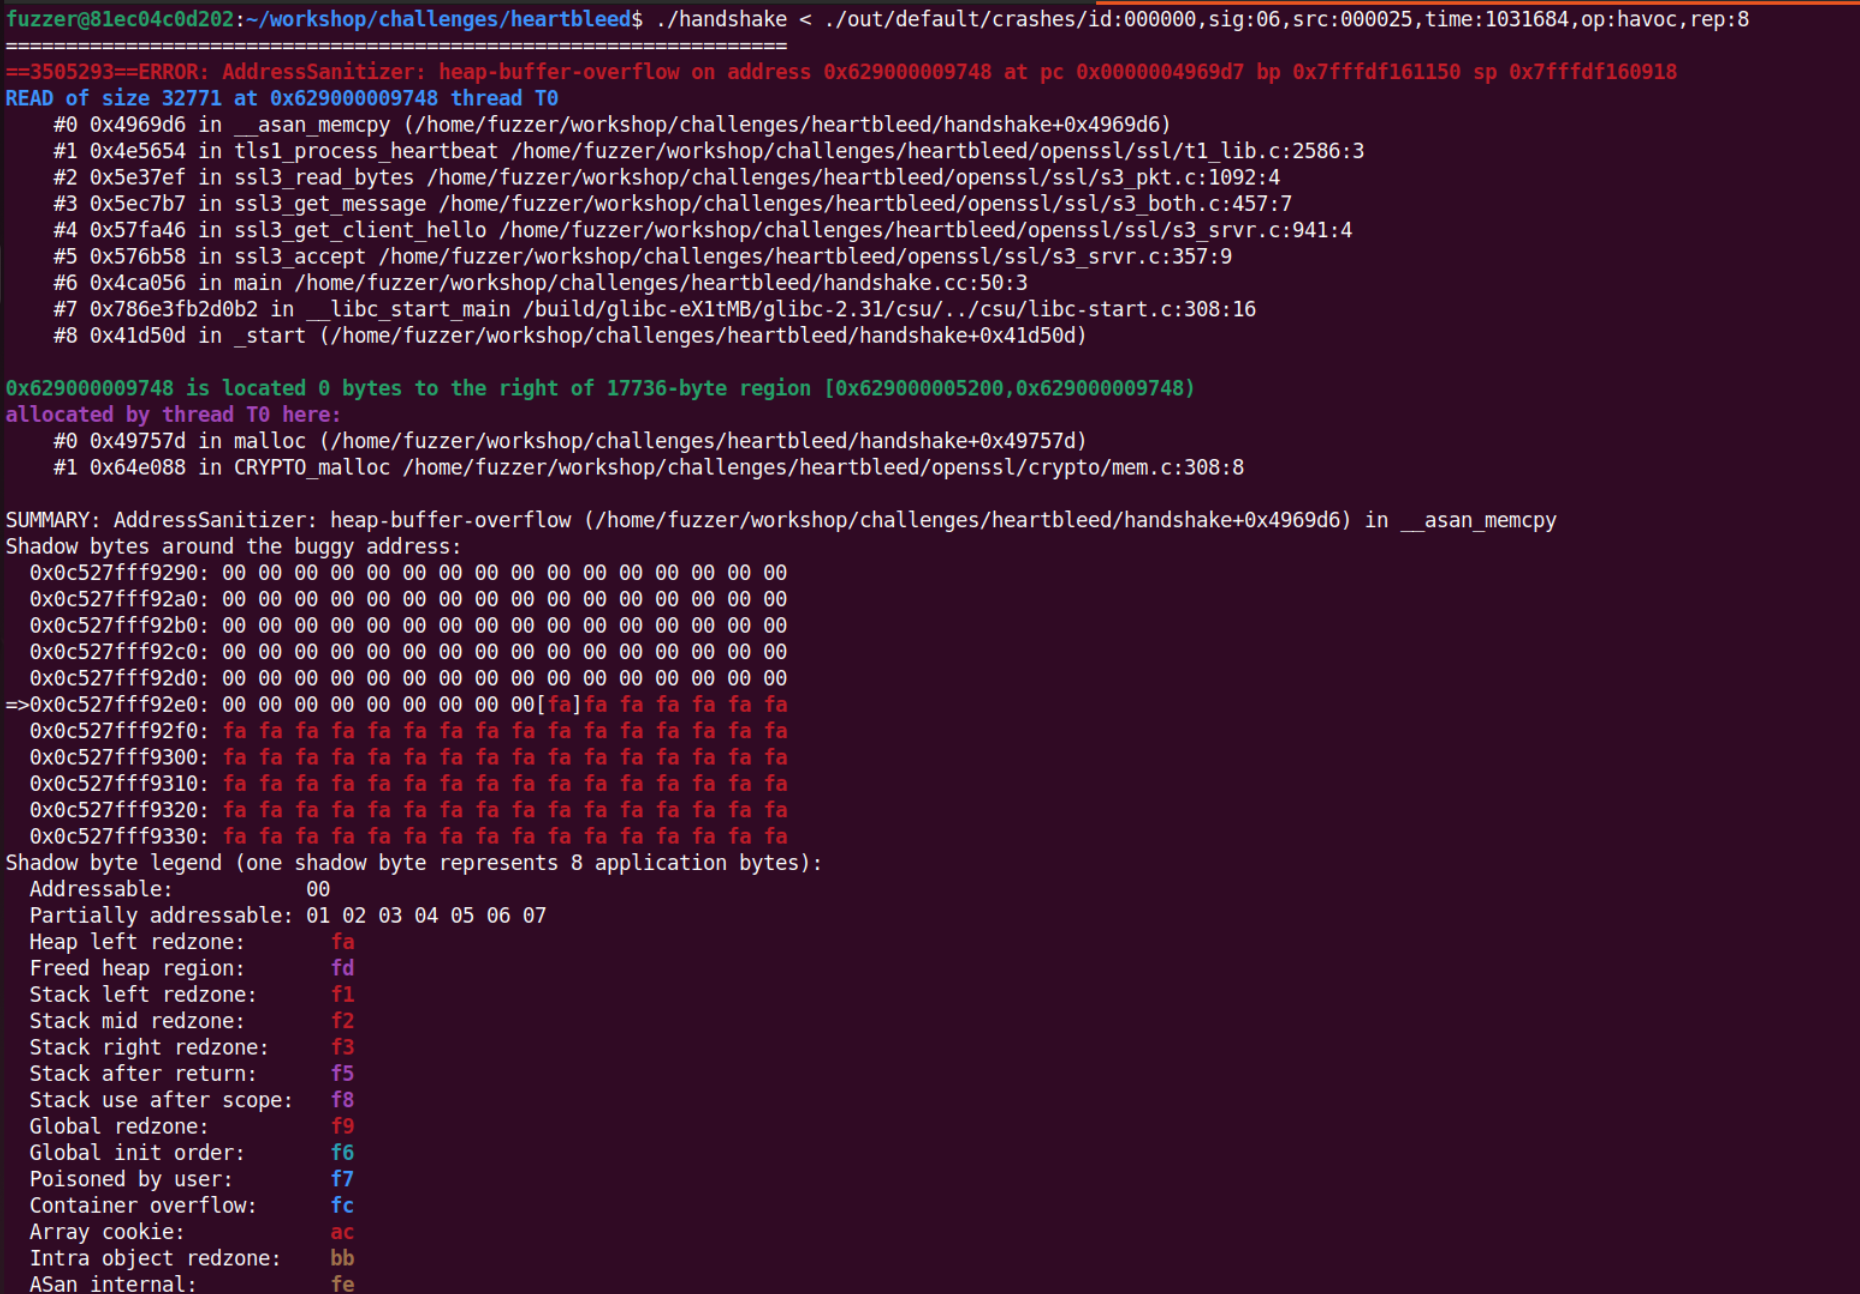
可以通过 ASAN 看到具体的漏洞信息,心脏滴血漏洞会越界泄露内存中的数据信息。
nipaste_2024-07-20_16-35-2

5. ntpq

NTP(Network Time Protocol,网络时间协议)是一种用于在计算机系统之间同步时钟的协议。NTP 的主要目的是通过网络将计算机的时间设置为与参考时钟一致,以确保在分布式系统中时间的一致性。

ntpq 是一个网络时间协议 (NTP) 查询工具,用于与 NTP 服务器通信,检查和管理系统时间同步状态。ntpq 工具通常用于获取有关 NTP 守护程序运行状态的信息。以下是一些常见的用途和功能:

  1. 显示NTP服务器状态ntpq 可以查询本地或远程 NTP 服务器,显示其当前状态,包括服务器列表、偏移量、延迟等信息。常用命令是 ntpq -p,它会列出 NTP 服务器的对等体 (peers) 状态。
  2. 查询服务器配置信息ntpq 允许用户查询 NTP 服务器的配置信息和统计数据。这可以帮助诊断和解决时间同步问题。
  3. 监控和管理NTP守护程序ntpq 工具可以用于监控 NTP 守护程序的性能,并执行管理任务,例如启用或禁用特定的 NTP 对等体。
  4. 交互模式:通过启动 ntpq 而不带任何选项,用户可以进入交互模式,在此模式下可以逐个输入命令来查询和管理 NTP 服务器。

测试的 ntpq 的版本是 4.2.2

模糊测试的漏洞目标是CVE-2009-0159: NTP Remote Stack Overflow ,是在cookedprint函数中出的问题。

这里思考如何实现利用afl-fuzz对网络收发包程序ntpq的模糊测试,比较好的方式直接对目标函数cookedprint 进行针对性的 fuzz,以避免直接用 afl 构造 ntpq 数据包。

cookedprint函数原型如下所示,从标准输入中获取datatypelengthdata以及status,并将fp重定向给stdout,并对函数进行调用就可以了。

1
2
3
4
5
6
7
8
9
10
11
12
13
// ntpq.c: 3000 
/*
* cookedprint - output variables in cooked mode
*/
static void
cookedprint(
int datatype,
int length,
char *data,
int status,
FILE *fp
)
{

test_harness 如下:

1
2
3
4
5
6
7
8
9
10
11
12
13
14
15
16
17
18
19
20
21
#ifdef __AFL_HAVE_MANUAL_CONTROL
__AFL_INIT();
#endif
int datatype=0;
int status=0;
char data[1024*16] = {0};
int length=0;
#ifdef __AFL_HAVE_MANUAL_CONTROL
while (__AFL_LOOP(1000)) {
#endif
datatype=0;
status=0;
memset(data,0,1024*16);
read(0, &datatype, 1);
read(0, &status, 1);
length = read(0, data, 1024 * 16);
cookedprint(datatype, length, data, status, stdout);
#ifdef __AFL_HAVE_MANUAL_CONTROL
}
#endif
return 0;

将上面这段代码插入到 ntpq/ntpq.cmain 函数中,删除原来的 return ntpqmain(argc, argv);。开始尝试对目标进行fuzz

1
2
3
4
CC=afl-clang-fast ./configure && AFL_HARDEN=1 make -C ntpq
mkdir in
echo 123 > in/seed
afl-fuzz -i in -o out -x ntpq.dict ntp-4.2.2/ntpq/ntpq

nipaste_2024-07-20_19-42-0

在很短的时间之内,爆出了很多 crash。

nipaste_2024-07-20_19-52-2

然后可以来看看覆盖率如何,可以使用 llvm 中对 gcov 的支持来查看覆盖率。简单来说gcov是一个测试代码覆盖率的工具,是一个命令行方式的控制台程序,需要结合lcov,gcovr等前端图形工具才能实现统计数据图形化。

执行下面的指令

1
2
3
cd ntp-4.2.2
make distclean
CC=clang CFLAGS="--coverage -g -O0" ./configure && make -C ntpq

然后调用ntpq运行out/queue目录下所有的文件,该目录下存储的是会触发新路径的文件,运行一次即可记录所有覆盖的路径:

1
for F in out/default/queue/id* ; do ./ntp-4.2.2/ntpq/ntpq < $F > /dev/null ; done

生成gcov报告:

1
2
cd ntp-4.2.2/ntpq 
llvm-cov-11 gcov ntpq.c

nipaste_2024-07-20_19-59-1

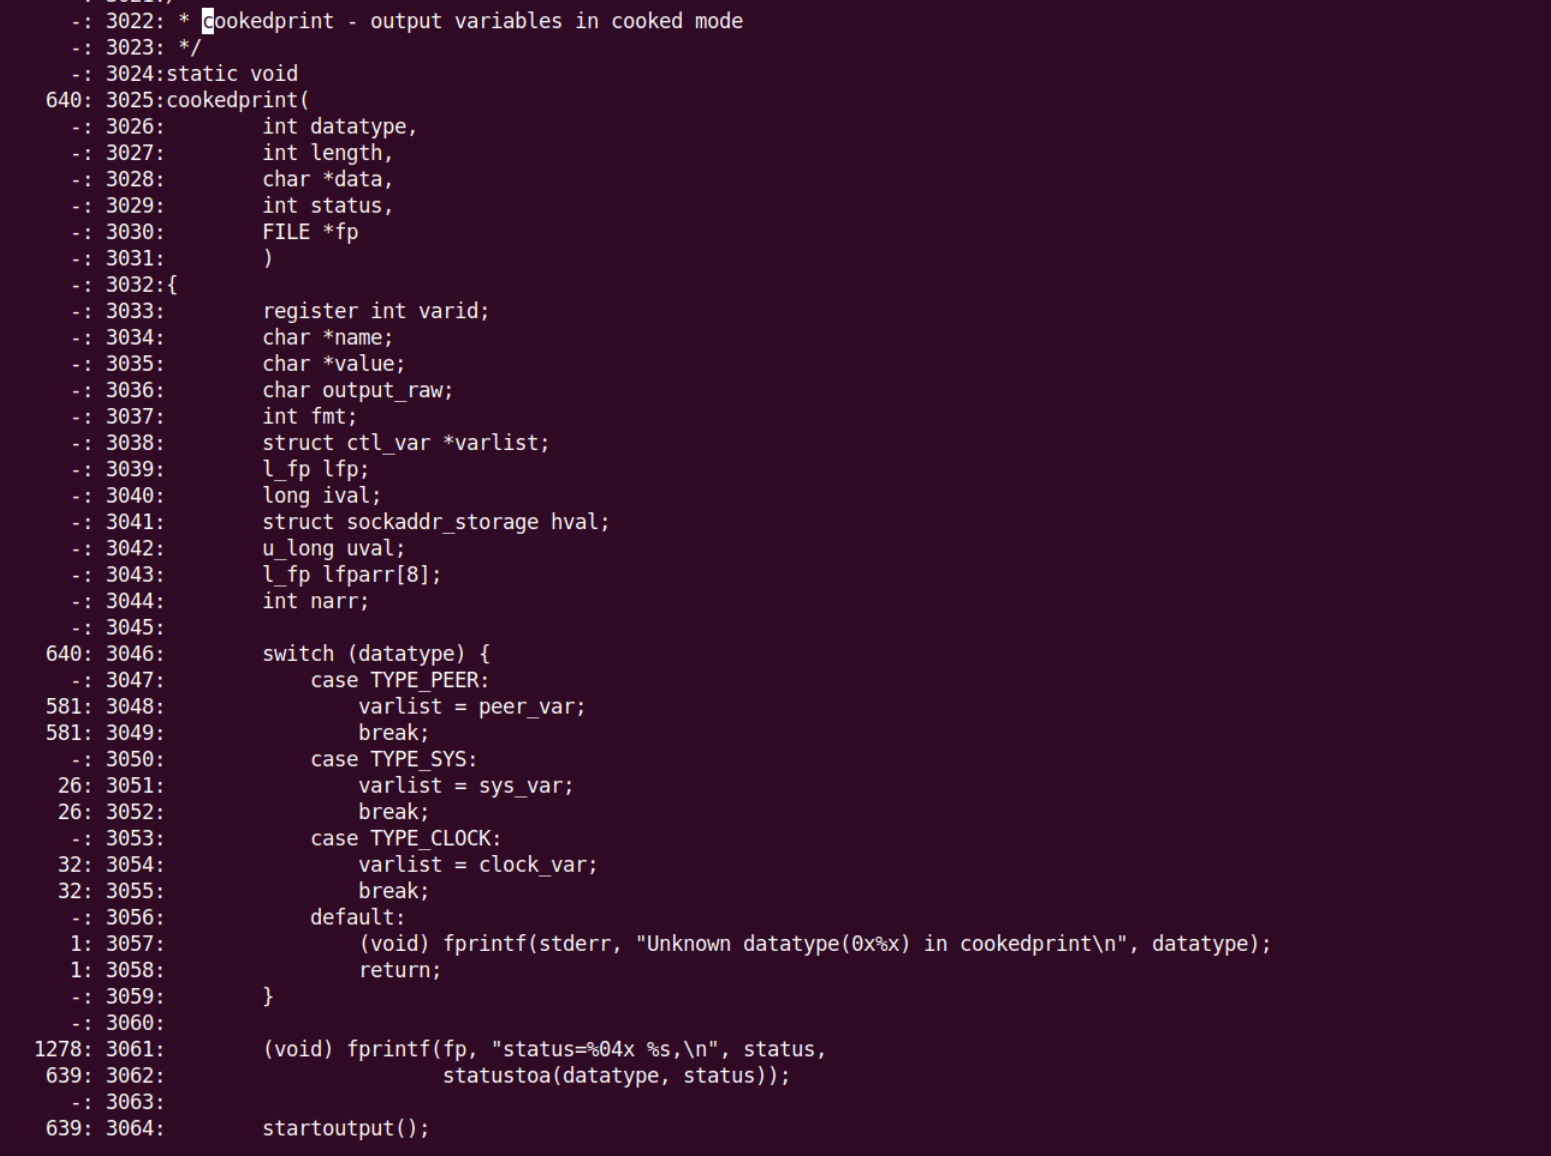
在生成的报告中,我们主要来关注cookedprint函数,其中前面是-的表示是没有对应生成代码的区域(变量声明之类的语句);前面是数字的表示执行了的次数;前面是#####的表示是没有执行到的代码,可以通过观察覆盖率然后调整种子提升模糊测试效率。
nipaste_2024-07-20_20-08-3

可以根据这些覆盖率信息来动态调整模糊测试的信息。

6. sendmail

1301

环境搭建

1
2
3
4
5
make clean
CC=afl-clang-fast make
mkdir in
echo a > in/1
afl-fuzz -i in -o out ./m1-bad @@

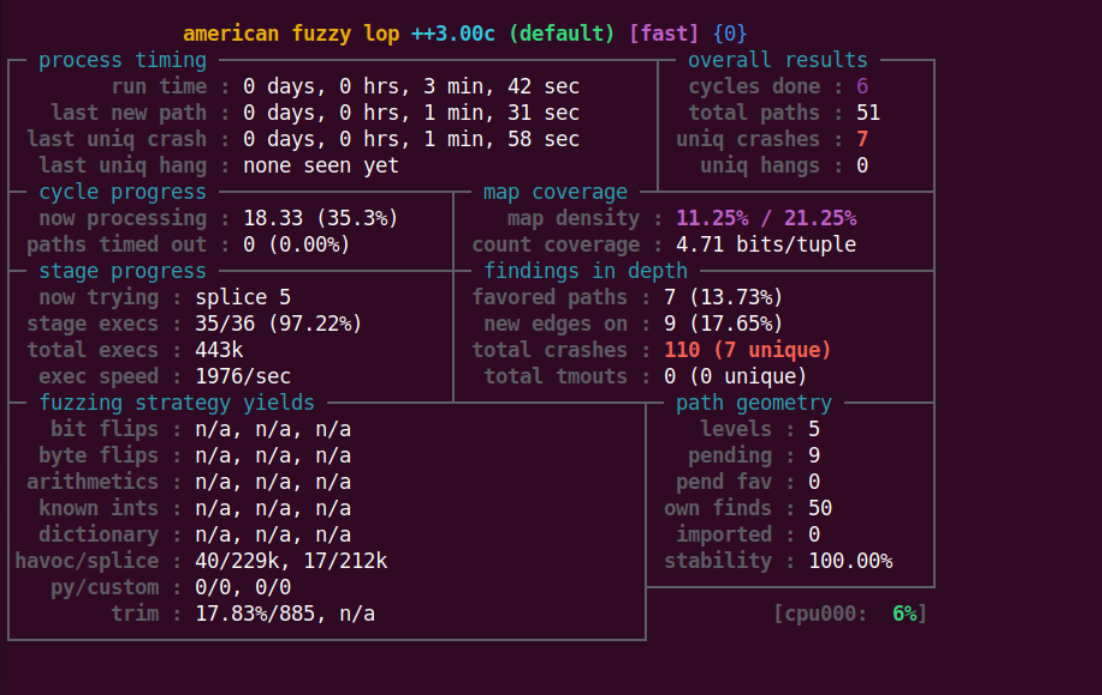
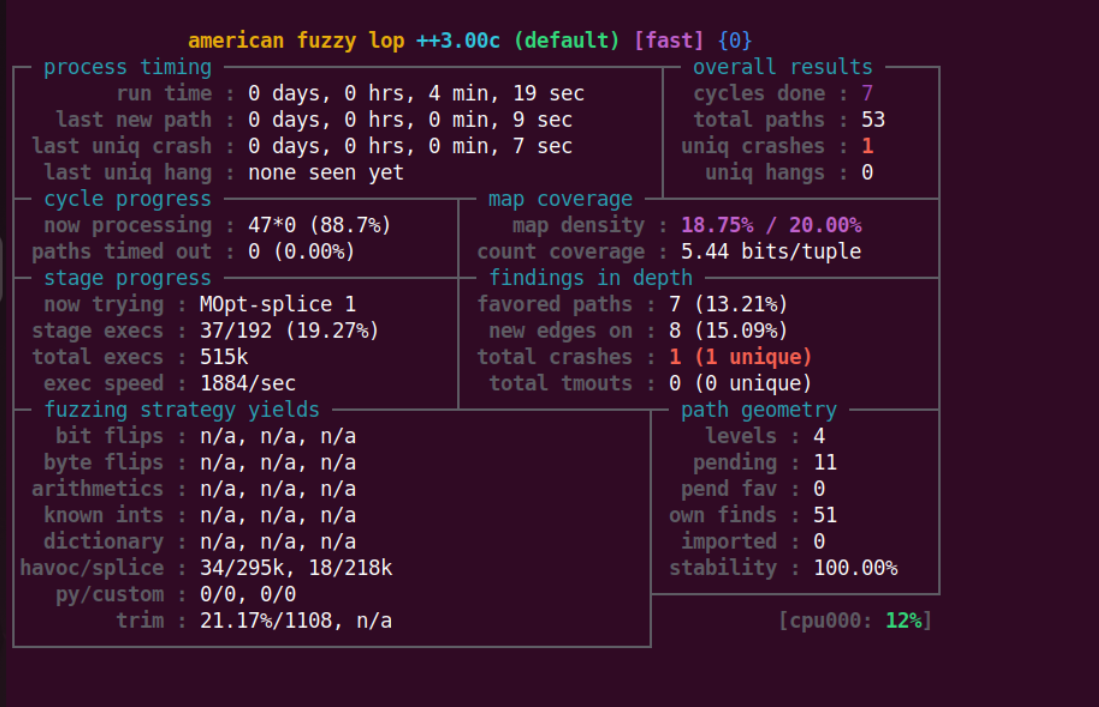
经过三分钟之后,结果如下发现了7个crash

nipaste_2024-07-20_20-23-3

HINTS.md文件中给出,一个好的种子的设置可以用来快速帮助发现 crash,这里我们知道程序是一个 MIME 协议的解析器,所以这里使用如下种子:

1
echo -e "a=\nb=" > in/multiline

这搞了个鸡毛,到4 min 的时候,才 fuzz 出了第一个漏洞。

nipaste_2024-07-20_20-35-5

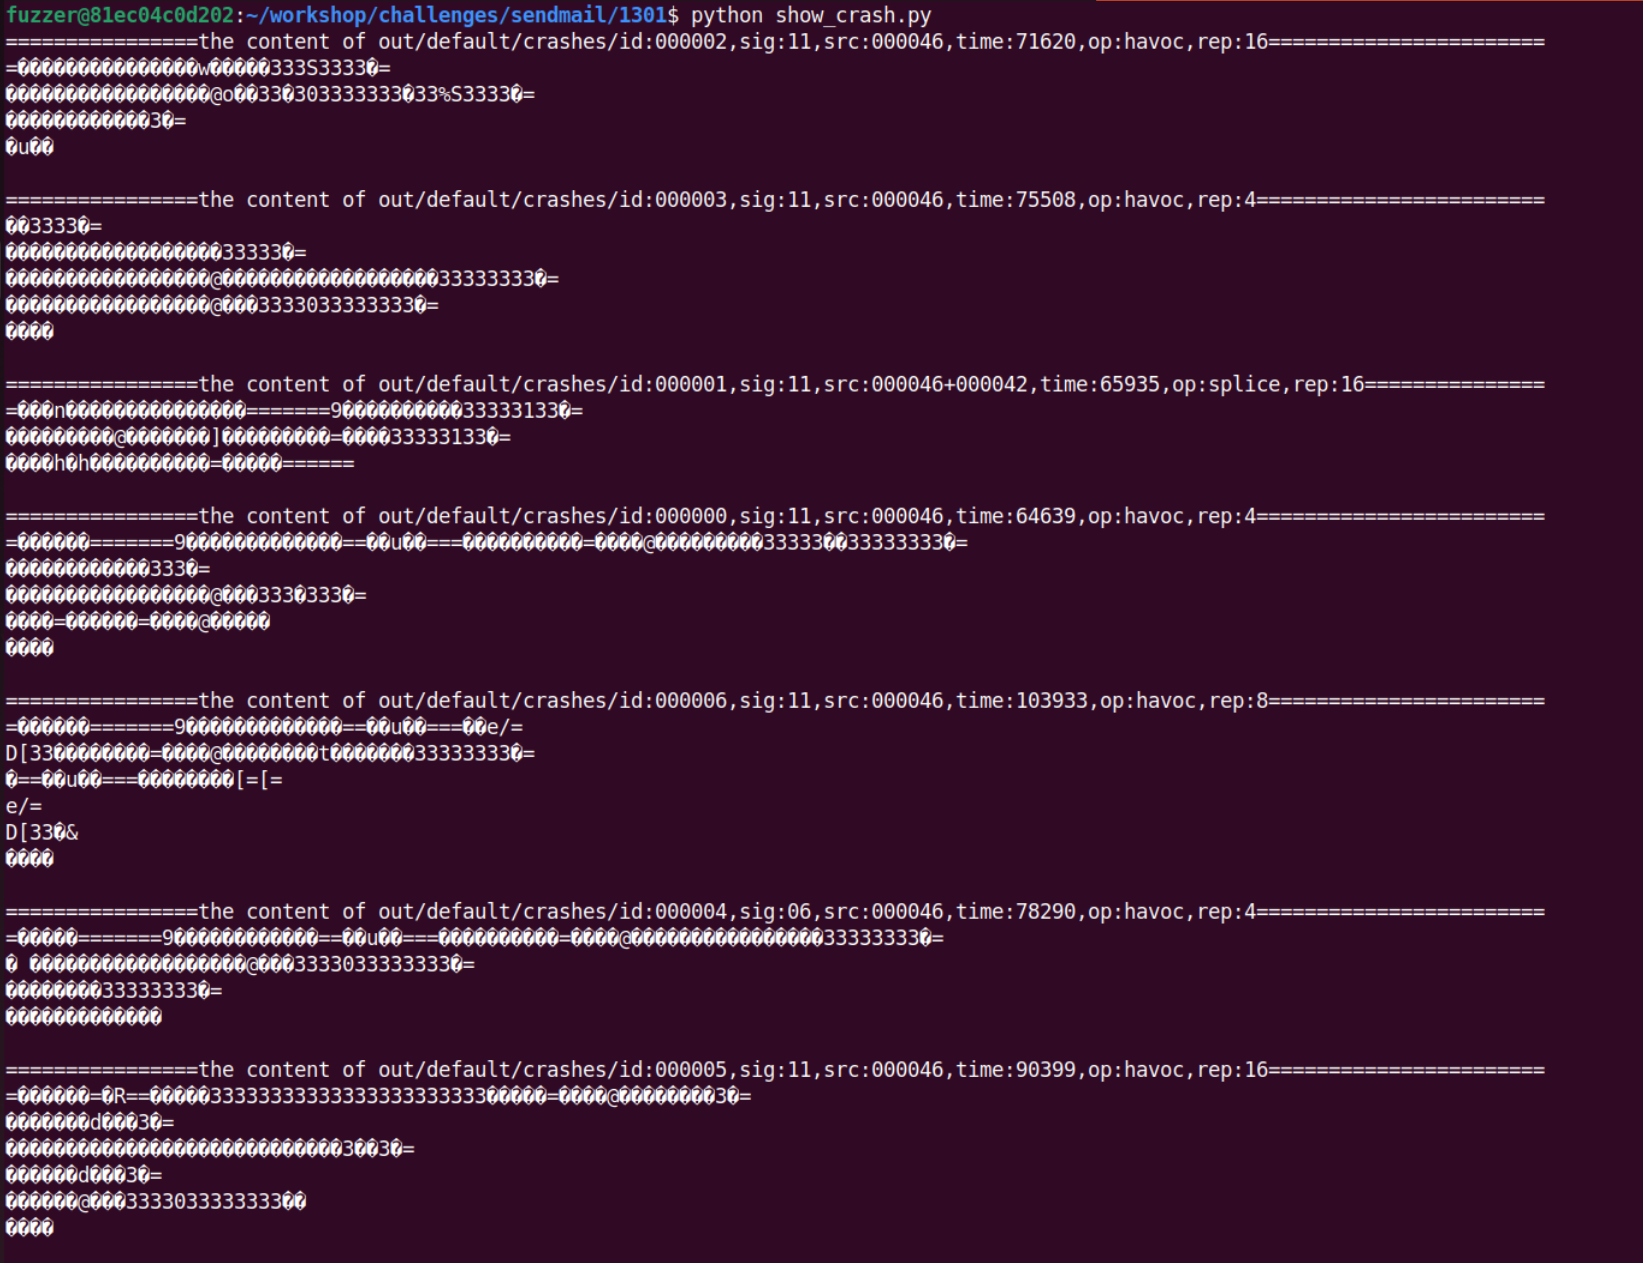
利用前面的脚本,打印出所有的 crash 信息

nipaste_2024-07-20_20-38-0

然后尝试使用 afl-tmin 对目标测试集进行精简

1
afl-tmin -i out/default/crashes/id:000000,sig:11,src:000046,time:64639,op:havoc,rep:4 -o minimized_out ./m1-bad @@

nipaste_2024-07-20_20-59-4

1305

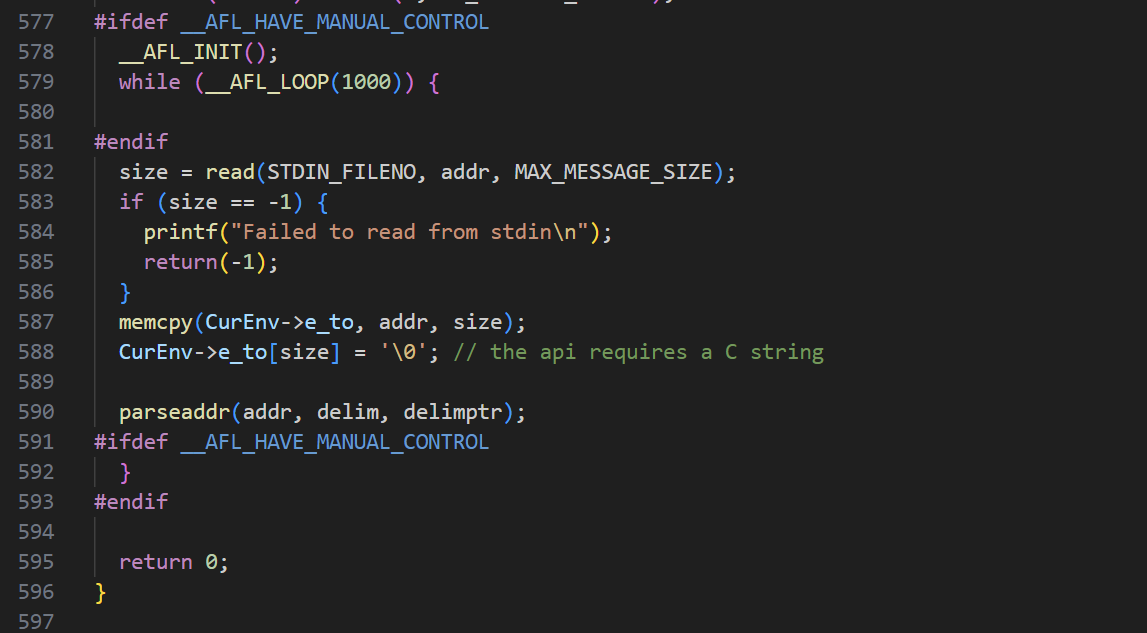
作者在 HINTS.md 提醒我们可以采用 persisten mode 和延迟初始化来提高性能。

1
2
3
4
cp prescan-overflow-bad-fuzz.c prescan-overflow-bad.c # 直接用作者写好的harness
CC=afl-clang-fast AFL_USE_ASAN=1 make #编译
echo -n "michael@mykter.com" > in/seed #设置初始输入为邮箱地址
afl-fuzz -i in -o out ./prescan-bad

nipaste_2024-07-20_21-17-4

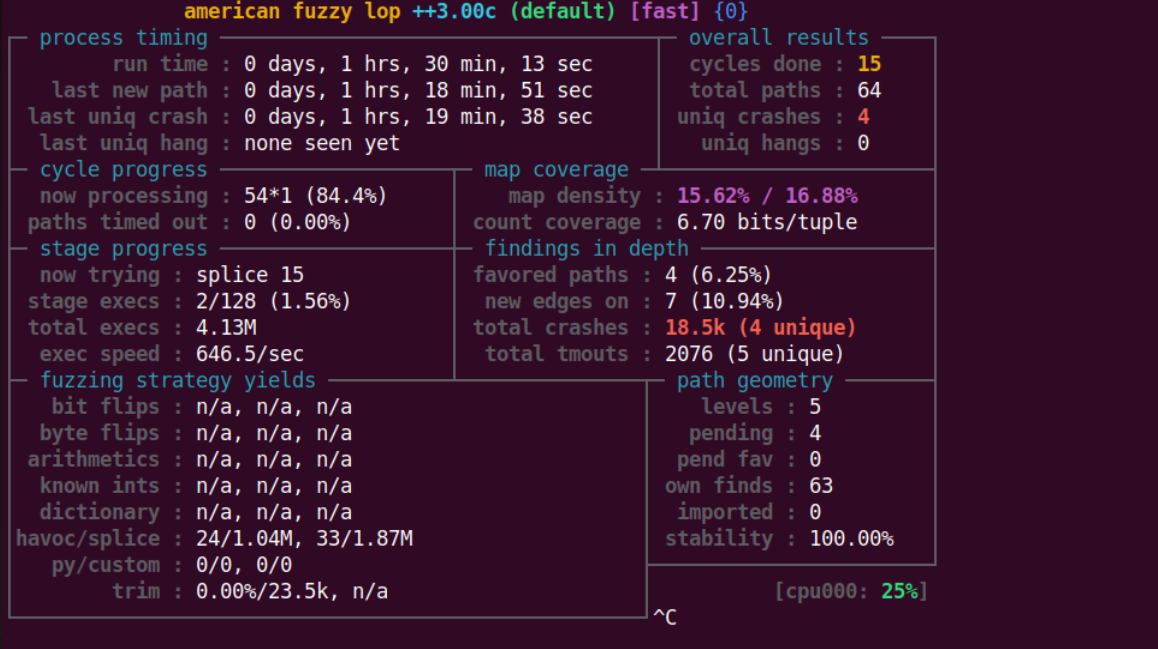
可以看到这里是采用了 persisten mode 的,所以实际fuzz的过程还是比较快的,结果略(比较慢)。

7. date

date命令是关于时间的命令,它可以用来查看、更改系统时间,它是coreutils组件中的一个程序。

可以通过设置不同的TZ环境变量来显示不同的时间:

1
2
3
4
5
6
7
8
9
10
11
12
henry@henry:~/Desktop$ date
2024年 07月 20日 星期六 21:23:16 CST
henry@henry:~/Desktop$ TZ='Asia/Tokyo' date
2024年 07月 20日 星期六 22:23:21 JST
henry@henry:~/Desktop$ date
2024年 07月 20日 星期六 21:23:42 CST
henry@henry:~/Desktop$ TZ='Asia/Tokyo' date
2024年 07月 20日 星期六 22:23:49 JST
henry@henry:~/Desktop$ TZ='America/Los_Angeles' date
2024年 07月 20日 星期六 06:23:55 PDT
henry@henry:~/Desktop$ TZ='Europe/London' date
2024年 07月 20日 星期六 14:24:00 BST

环境搭建

1
2
3
4
5
6
7
8
9
10
11
12
$ cd coreutils
$ ./bootstrap # may finish with some errors to do with 'po' files, which can be ignored

# this old version doesn't work with modern compilers, we need to apply a patch
# this patch can get overwritten by certain make targets - if you get an error during compilation about fseeko.c, try re-applying the patch
$ patch --follow-symlinks -p1 < ../coreutils-8.29-gnulib-fflush.patch

$ CC=afl-clang-fast ./configure
$ make # this will build everything. you can try `make src/date`, but the makefile doesn't specify all of the dependencies properly so this will probably fail until you've built everything once

$ ./src/date
Mon Jul 3 08:11:23 PDT 2017

由于目前afl对从标准输入以及文件中读取的数据的fuzz支持的比较友好,对于环境变量的fuzz要进行一定的转换,主要途径有以下三种:

  • 从源码中找到相应的获取TZ环境变量(getenv)的地方,把代码修改成从标准输入获取数据;
  • 编写harness,在程序的开头设置TZ环境变量,然后继续运行;
  • 编写自定义的getenv函数并使用LD_PRELOAD来对函数进行hook,实现每次调用getenv函数时都从stdin中获取数据。

三种方式的优劣如下:

  • 在源代码中找到所有读取 TZ 环境变量的实例,并将其替换为从标准输入(stdin)中读取。
  • 编写一个测试框架(harness),它先设置环境变量,然后程序继续正常执行(例如修改 date.c 的 main 函数)。
  • 使用 LD_PRELOAD 来替换 getenv 的调用,使用一个自定义的包装器(wrapper)从标准输入中获取值。

第二种方式最简单,只需要在src/date.cmain函数开头加入从标准输入中获取数据并设置TZ环境变量的代码,diff代码如下所示。

1
2
3
4
5
$ diff src/date.c date_back.c
361,364d360
< char env_data[0x400];
< read(0, env_data, 0x400);
< setenv("TZ", env_data, 1);

重新编译

1
2
make clean 
AFL_USE_ASAN=1 make -j

设置种子进行fuzz

由于开启了ASAN特性,所以运行的时候最好用asan_cgroups/limit_memory.sh以限制内存

1
sudo ~/AFLplusplus/examples/asan_cgroups/limit_memory.sh -u fuzzer ~/AFLplusplus/afl-fuzz -m none -i in -o out  ~/Desktop/coreutils/src/date --date "2017-03-14T15:00-UTC"

也可以直接对目标进行 fuzz

1
afl-fuzz -m none -i in -o out ~/Desktop/coreutils/src/date --date "2017-03-14 15:00 UTC"

不过很遗憾,我自己在尝试的过程中一直开在了 bootstrap 这一步,导致实验无法进行

nipaste_2024-07-20_22-14-2

8. cyber-grand-challenge

README.md 文件中对该题目的描述为:

这个程序有两个漏洞。第一个漏洞很容易被利用。第二个漏洞看起来很难通过模糊测试发现——crash.input 有一个崩溃输入示例。这个没有 HINTS 或 ANSWERS 文件 - 因为二进制文件已经从 stdin 中获取输入,所以模糊测试非常简单 - 有关更多详细信息,请参阅 quickstart/harness/the other challenges。第二个漏洞非常难,我不知道如何找到它!

所以说这里我们直接不浪费时间,搞完简单的直接下班

1
2
CC=afl-clang-fast AFL_HARDEN=1 make
afl-fuzz -i in -o out ./cromu_00007

nipaste_2024-07-20_23-53-0

nipaste_2024-07-20_23-53-2

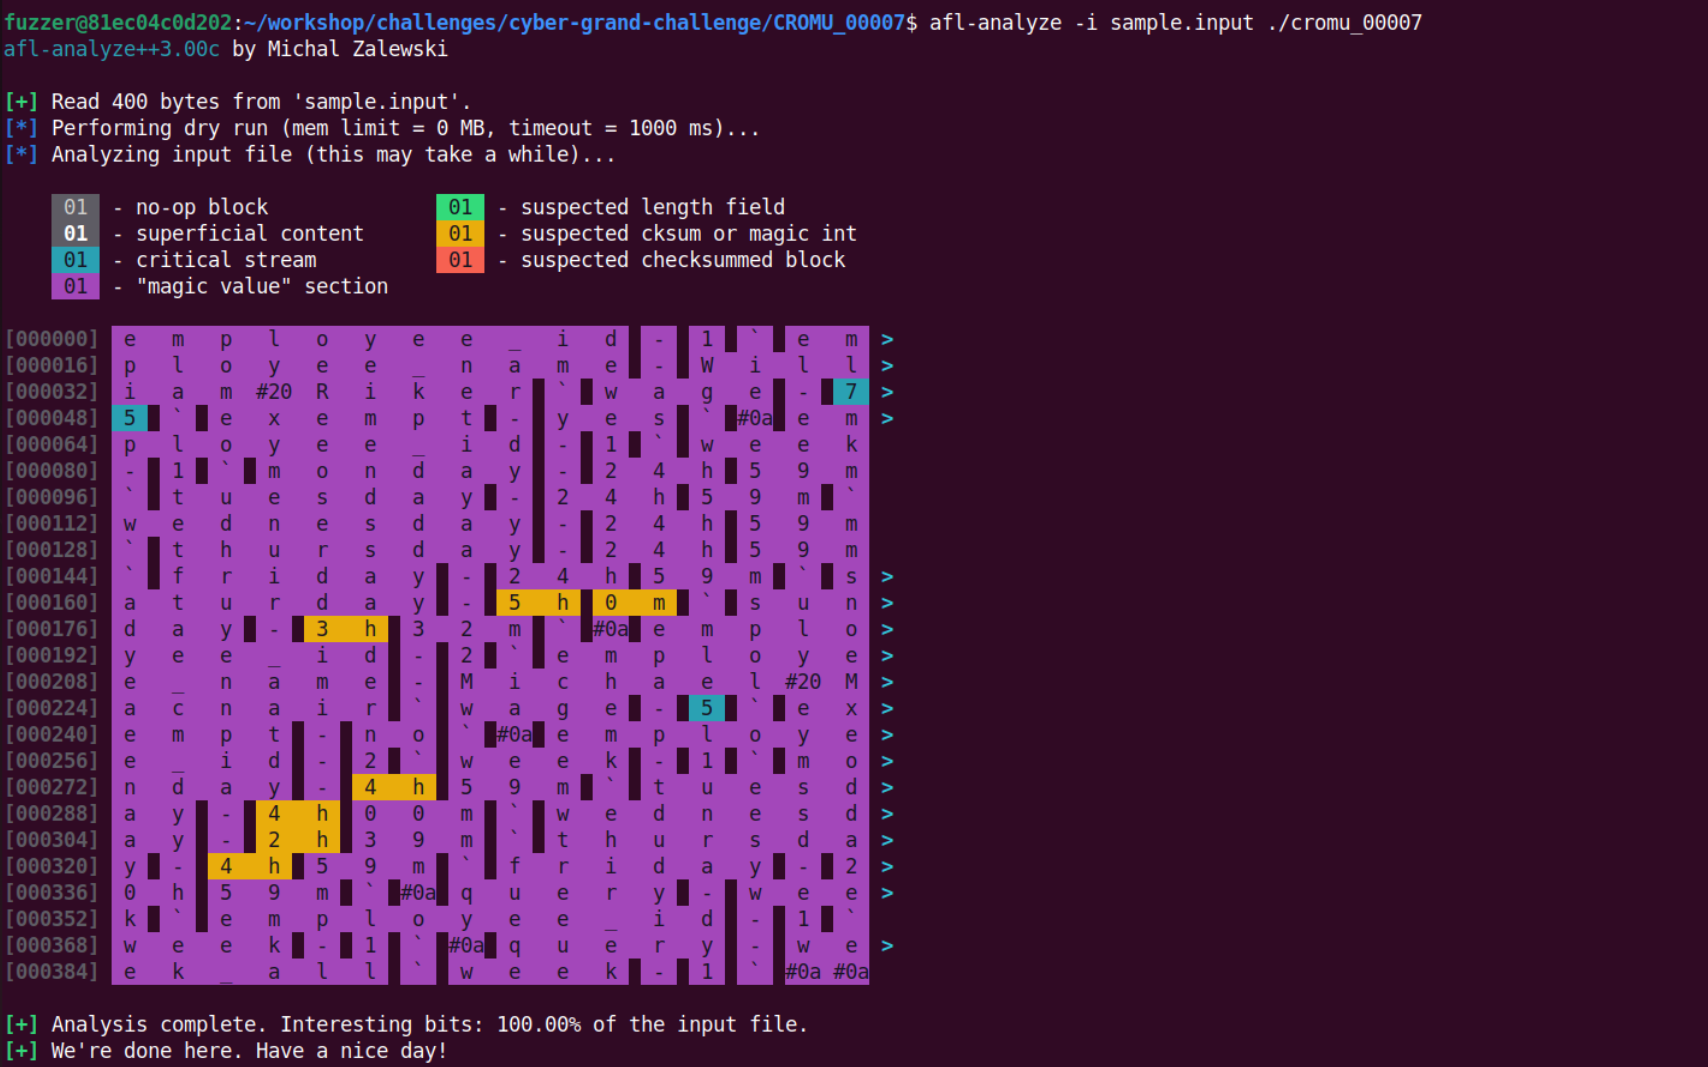
下面的命令可以用输入文件,对测试目标进行分析

1
afl-analyze -i sample.input ./cromu_00007

nipaste_2024-07-20_23-56-4

Reference

https://tttang.com/archive/1508/#toc_sendmail1305

https://www.anquanke.com/post/id/254167#h2-6

https://github.com/mykter/afl-training

https://arttnba3.cn/2021/02/01/FUZZ-0X00-AFL-I/

  • Title: Fuzzing with AFL workshop
  • Author: henry
  • Created at : 2024-07-21 00:00:02
  • Updated at : 2024-07-21 00:04:31
  • Link: https://henrymartin262.github.io/2024/07/21/afl-training/
  • License: This work is licensed under CC BY-NC-SA 4.0.
 Comments